Frame/Product Inspector
The Frame/Product inspector displays the specifications of products selected in the Product panel or on a layout, and allows you to modify them.
 |
NOTE: Modifications made in the inspector do not affect products already placed on a layout.
Selection
Title
The title shows the type of the selected item(s); Product, Frame, Group, Grid, CAD group, Mixed selection, Embedded product, or No selection.
Size
The size of the selected item(s). The size of a placed product can be different from that of the original product or that of other places copies, unless the product is uniform.
Design
The Design shows the name of the design and its origin.
Station
The station number of the frame displays the current station number. You can change the station number.
Content ID
The frame content ID which is only active when a product or frame is selected on a sheet. If the frame contains a product, you cannot edit this box because the sheet is locked. In this case you will see the locked frame icon next to the box.
Original
This section shows the name, copy count, the size-breakdown and the lowest printed resolution of the product when the selected item(s) refer to a single product.
Product name
The name of the product.
Fitting options
Click the gray arrow next to the file name to open the Fitting Options where you can modify the cropping and fitting settings for a product selected on the sheet. See “Fitting Options Dialog Box”.
Copies
Enter the total number of copies of the selected product that you want to print, i.e. the number of copies on all the layouts multiplied by the run length.
NOTE: This is not the number of products on the current sheet.
Size
The dimensions of the original product. If the product has been edited in the Product Editor, the most recent product size (with crop and scale) is specified instead of the original product size.
Lowest printed resolution
The Lowest printed resolution and the corresponding scaling factor. This is the lowest resolution found in all placed copies.
Edit product button
Opens a product selected in the list of products in the Product Editor.
Bleed/Mask
Amount
The bleed, i.e. content that goes beyond the trim size, is the same for all products as inherited from the job ticket. You can set a different bleed that you want to render for the selected product here. Leave the link icon closed to set the same bleed on all sides or open the link icon if you want to enter specific values for Left, Right, Top or Bottom.
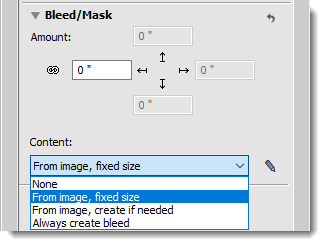 |
Content
From the drop-list you can specify when bleed is created by the system or taken from the bleed area available in the image file. These options are mainly relevant for images which have a bleed area present in the image file. Only the first and the last options are relevant if the image has no bleed area.
•None: Sets the maximum bleed to 0 even if bleed is provided in the image file. The bleed box coincides with the canvas extension box or the product size.
•From image, fixed size: The system uses the bleed in the image file for the maximum bleed you specified or only what is available if the bleed in the image is less than the specified bleed.
•From image, create if needed: The system uses the bleed in the image file if it is equal or greater than the specified maximum bleed; if the image bleed is less than the specified bleed, the system creates the bleed and does not use the image bleed.
•Always create bleed: The system creates the maximum bleed, effectively replacing any bleed in the image file.
You can fine-tune or change the behavior by clicking the pencil icon next to the bleed types to open the Bleed Generator dialog box. See “Bleed Generator”.
Finishing
Clip to contour
Select this check box in the Finishing panel to crop and clip the product to the contour instead of to the frame. Leave unchecked, if you do not want to clip to contours. The default behavior can be changed in the Contour Preferences in the cogwheel menu (Set ‘Clip to Contour’ on new products). If the product has a finishing operation path and this option is selected, the cut path icon is displayed next to the product in the Product panel.
 |
Finishing
A list of finishing operations that apply for the product. The table shows how Content Elements of the product (spot colors) are mapped to operations. Click the Add button to add operations, or click the cogwheel to open a menu where you can add, edit, delete, reapply finishing operations and open the Finishing Hub. See “Finishing Hub” for more information.
Product operations
A summary of the product edits made in the Product Editor: canvas extensions, grommets and tiling.
doc. version 2.1.1