PrintSphere Service (Upload Files)
NOTE: Only with the PrintSphere service.
With the PrintSphere service, you do not have to log in to ProductionCenter to upload files. Your printer has chosen for you to use his PrintSphere file-sharing service so you can easily upload files for jobs to a special folder in the PrintSphere space. The files are then processed automatically by the printer company.
 |
As a Manual PrintSphere user, you can also use the PrintSphere service for other file-sharing and storage activities. Read the PrintSphere Help for more information.
Upload files with PrintSphere (Manual PrintSphere user)
If you are a Manual PrintSphere user, you first receive an e-mail from your printer to initialize a password for the new PrintSphere account. These credentials must then be used to access the PrintSphere space when the e-mail notification arrives to upload your files for a job.
1 Click the link in the e-mail that you received from your printer requesting that you upload documents for the job at hand.
2 Your default browser opens the PrintSphere space and you need to log in with your PrintSphere credentials. Read the PrintSphere Help for more information.
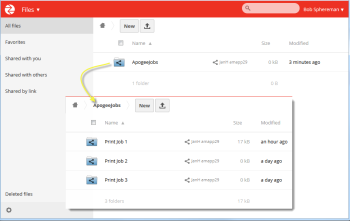
Your PrintSphere space opens and you are in the job folder.
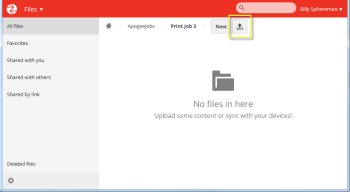 |
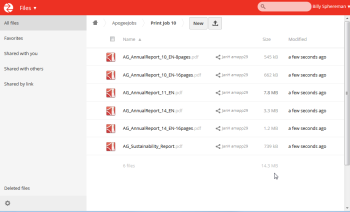
Click the Upload button to add files to this job folder. In some browsers you can drag and drop files in the folder. A variety of file types can be uploaded for documents, images, etc.
 |
As soon as the file as are uploaded, they are synchronized with the printer’s workflow system and processing can start.
TIP: File naming conventions can be used to automatically place files. Check with your printer.
 |
The files in the job upload folder are moved to the printer’s workflow input channel and once the uploading process is complete, they will no longer be visible in the job upload folder. This means you cannot delete, download, or share files you upload to this special folder.
3 Press the F5 key to refresh your browser.
The job upload folder should be empty.
4 Log off.
NOTE: As a Manual PrintSphere user, you can browse your PrintSphere space and manage the folders, however, you should not delete or rename any of these job upload folders.
You cannot use these folders to share files with other users because they are only synchronized to the printer’s workflow system.
You cannot use these folders to share files with other users because they are only synchronized to the printer’s workflow system.
Upload files with PrintSphere (Auto PrintSphere user)
If you are an Auto PrintSphere user or a guest user, you only receive an e-mail notification with a link to the job upload folder. You can access this folder without logging in but you have no credentials to access the PrintSphere space.
1 Click the link in the e-mail that you received from your printer requesting that you upload documents for the job at hand.
2 Your default browser opens the PrintSphere space and you are in the job folder. There is no need to log in.
 |
3 Click the Upload button to add files to this job folder. In some browsers you can drag and drop files in the folder.
|
A variety of file types can be uploaded for documents, images, etc.
NOTE: As an Auto PrintSphere user, you cannot delete uploaded files or browse the PrintSphere space.
When the uploading has finished, the files are moved to the printer’s workflow system and processed automatically.
4 Log off.
doc. version 13.5.1