Managing Jobs
The Manage Jobs feature allows you to archive and delete a job or multiple jobs.
By default, only Administrators can manage jobs in WebFlow. CSRs can manage jobs when the CSRs can manage jobs option is enabled for Job Rights. See “Printer Company and Print Center Settings”.
Archive Jobs in Manage Jobs Mode
In Manage Jobs mode, you can select one or more jobs and archive them all at once.
1 Go to Jobs (press J), select Job Tiles view. Click the Manage Jobs button at the top of the job list. The Job Tiles view now has a blue border.
2 Select the check boxes in the tiles for the jobs you want to archive. You can also select all jobs with Select All button.
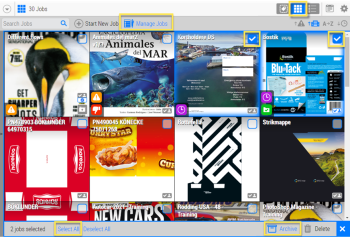 |
3 Click the Archive button at the bottom right of the page.
4 In the confirmation window, click Archive to confirm.
5 To exit the Manage Jobs mode, click X.
OR
1 Go to Jobs (press J), select Job List view. Click the Manage Jobs button at the top of the job list. The Job List view now has a blue border.
2 Select the check boxes at the end of each row for the jobs you want to archive. You can also select all jobs with Select All button.
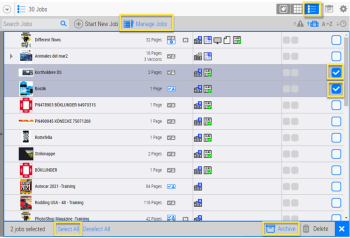 |
3 Click the Archive button at the bottom right of the page.
4 In the confirmation window, click Archive to confirm.
5 To exit the Manage Jobs mode, click X.
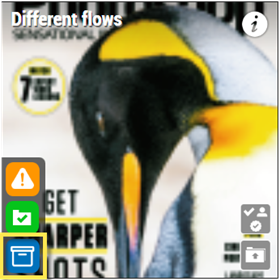
The jobs remain visible in the lists and the Archived status icon is displayed, after the Archive command has been performed:
•In the Job Tiles view, the Archived status icon is displayed in the left corner.
 |
•In the Job List view, the Archived status icon is displayed next to the Finished status column.
 |
NOTE: In Manage Jobs mode, the context-click option is not provided.
Archive Jobs with Context Menu
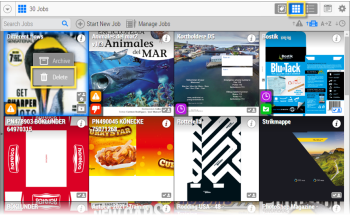
1 Go to Jobs (press J), select Job Tiles view.
2 Right-click on the job tile you want to archive and click Archive.
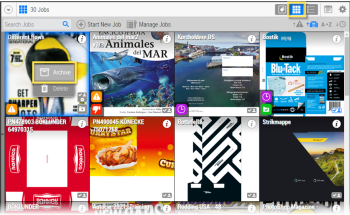 |
3 In the confirmation window, click Archive to confirm.
OR
1 Go to Jobs (press J), select Job List view.
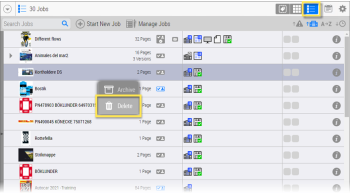
2 Right-click on the job row you want to archive and click Archive.
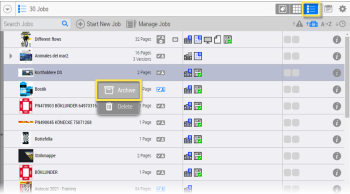 |
3 In the confirmation window, click Archive to confirm.
Delete Jobs in Manage Jobs Mode
In Manage Jobs mode, you can select one or more jobs and delete them all at once.
1 Go to Jobs (press J), select Job Tiles view. Click the Manage Jobs button at the top of the job list. The Job Tiles view now has a blue border.
2 Select the check boxes in the tiles for the jobs you want to delete. You can also select all jobs with Select All button.
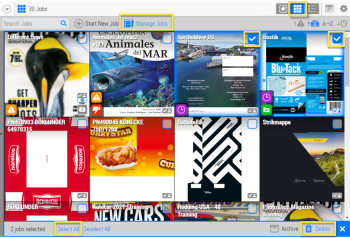 |
3 Click the Delete button at the bottom right of the page.
4 In the confirmation window, click Delete to confirm.
5 To exit the Manage Jobs mode, click X.
OR
1 Go to Jobs (press J), select Job List view. Click the Manage Jobs button at the top of the job list. The Job List view now has a blue border.
2 Select the check boxes at the end of each row for the jobs you want to delete. You can also select all jobs with Select All button.
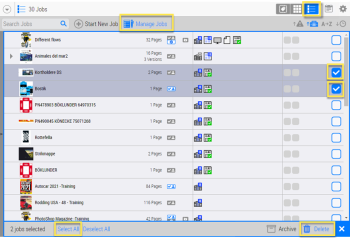 |
3 Click the Delete button at the bottom right of the page.
4 In the confirmation window, click Delete to confirm.
5 To exit the Manage Jobs mode, click X.
NOTE: Deleting jobs in WebFlow will also delete them in Apogee Prepress, but the jobs will not be purged.
NOTE: In Manage Jobs mode, the context-click option is not provided.
Delete Jobs with Context Menu
1 Go to Jobs (press J), select Job Tiles view.
2 Right-click on the job tile you want to delete and click Delete.
 |
3 In the confirmation window, click Delete to confirm.
OR
1 Go to Jobs (press J), select Job List view.
2 Right-click on the job row you want to delete and click Delete.
 |
3 In the confirmation window, click Delete to confirm.
When a job is deleted from the system, it is possible that a User might be looking at this job. A notification message appears in this instance.
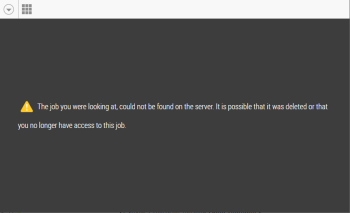 |
It is also possible that a User cannot see the job because he has no longer access rights.
NOTE: Same type of messages appear after deleting a User, a Company, or a Print Center.
doc. version 13.5.1