Canvas Extensions and Grommets Inspector
With canvas extensions you can add extra material to one or multiple edges of the image to create flaps. Grommets can be positioned in these extensions or in a product without extensions.
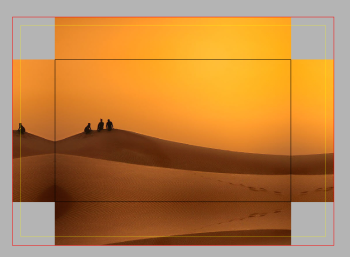 |
• Canvas extension between the black product box (image) and yellow extension box • Bleed between the yellow extension box and red bleed box |
 |
Canvas Extensions
You can specify the size of canvas extension and whether they are filled with content created by the system or left empty. Any bleed you specified in the image inspector is added to these extensions.
Select the Canvas Extensions check box to enable the settings:
Size
Specify the size that you want the canvas to extend beyond the product size. Enter one value for all sides or open the link icon to enter different values for the four sides as desired. Press Enter to apply the values.
Fill Corners
This check box has to be cleared to create open flaps; when selected, corners with adjacent flaps are filled.
Content
Here you can choose how the system will create content to fill the extensions:
•Scale image: The image is scaled proportionately so it fills the product size plus the canvas extensions plus the bleed areas
•Mirror image: The extensions are filled by mirroring the content within the extension range along the edges of the product box, optionally, starting from a specified inset inside the product box and on top of the existing content. This is useful if the image content does not extend to the product box. The bleed is a continuation of this mirrored content.
•Mirror and Flip image: Flips the image horizontally and mirrors the flipped image into the flaps. This option is needed for front/back printing the same image on opaque media.
•Image bleed: The extensions are filled with the bleed present in the image file or the generated bleed that runs into the extensions. If you cropped the image, the cropped parts are used.
•Color: Fills the extensions with a solid color (CMYK or RGB) that you can choose with the color picker. Open the color picker by clicking the patch next to the Content drop-down list when this option is selected.
•No ink: Leaves the extensions and bleed areas empty.
No-ink zone
Enter a value for an area along the edges of the flaps where no ink is allowed. Entering a value here automatically disables any bleed settings.
Total frame size
Displays the total frame size.
Print line marks
You can use Print Line Marks to draw and print lines and create a printed box around the image and its extensions – without using mark sets. You can set the line thickness, color (open the color picker), and style (solid, dashed or dotted). The lines are centered on the extension borders.
NOTE: To see the line marks, apply the settings and place the image on a sheet.
•On product size: The lines are printed along the edges between the image and the extensions.
•On extensions: The lines create a closed box around the edges of the extensions.
•Only on edges with extensions: The lines are only printed on the edges of the canvas that actually have extensions so the box may not be closed.
Grommets
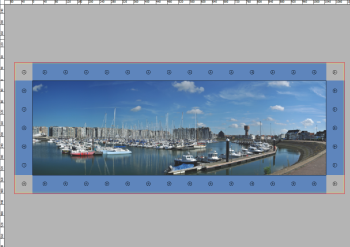 |
Grommets are holes for reinforced eyelets which are generally placed along the edges of a product. Marks can be drawn on the product to indicate where these holes are to be made. These settings let you choose where the marks are drawn and what they will look like.
Position
Click in the check boxes to position the grommet marks along the top, bottom, left or right edges.
Type
Four types of grommet marks are available:
•Solid circle
•Circle
•Circle with cross
•Cross
The marks can be drawn as an outline by selecting the Draw outlined check box.
Diameter
The diameter of the circle.
Line thickness
The thickness of all the mark lines.
Line length
The length of the 2 lines of the cross.
Color
The color of all the grommets. Click the variable button, and select one or more colors to change the color of the cutting lines:
 |
See “To print tile marks” for more information on using colors to print marks.
Draw in
You can choose to place the grommet marks in the image or the extensions, and specify the horizontal and vertical distance from either the outer edge of the image or the extensions. Close the link icon and re-enter a value if you want to use the same value for the horizontal and vertical distances.
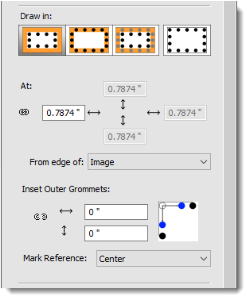 |
At
Specify how far the marks must be printed from either the edge of the Extension or from the Image. This is the distance between the reference point of the mark and the selected reference edges along each edge. This also sets the distance of the first and last grommets along the perpendicular edge.
From edge of
•Image: Draw the grommet marks on the image.
•Extensions: Draw the grommet marks in the extensions.
Inset Outer Grommets
Specify an inset for the first and last grommets of a line of grommets.
Mark Reference
Select whether to specify distances to the Circumference or the Center of the mark. The Circumference actually uses the bounding box of the mark.
•Center: specify the distances to the Center.
•Circumference: specify the distances to the Circumference.
Max. distance between marks
Enter the maximum distance between adjacent marks – horizontally and vertically. Close the link icon and re-enter a value if you want to use the same value for the horizontal and vertical distances. In the Mark Reference drop-down list you can choose from where the distance is calculated: the center of the mark or its circumference.
•Max distance between marks: Specify the maximum distance the between the reference points of two adjacent marks in the same direction. You can set the horizontal and vertical distances independently of each other. The minimum distance must be greater than or equal to 2 × max (diameter, line-length).
•Fixed number of marks: Specify the number of grommets to draw. You can specify the numbers per side or in pairs (horizontal and vertical). The minimum number is 2.
doc. version 13.1.1