Presets
NOTE: This option requires a special license.
Presets let you apply the settings you define for a particular image to other images of the same job or other jobs.
 |
The Presets dialog is displayed with a list of job presets and image presets on the left which are organized in folders. The list is initially empty. If you select an existing preset or create a new one you will see an overview of the settings that can be included in a preset in the panel on the right:
 |
These are the settings that you would normally have to specify in the image inspectors for a new image. To save time, you can include all or some of the settings in a preset which can subsequently be used for new images.
Presets toolbar
The + button to add a new preset; the cogwheel menu button and a gray triangle to open/close the settings panel.
Cogwheel menu
The following commands are available; the commands are also available by context-clicking the preset in the list:
•Apply: Applies the selected image preset to the open image
•Apply to New Images: The preset is applied to all images you add to the job. This option can be used to add image processing automation to Layout ticket templates (see “Creating Templates for Wide Format Jobs”).
•Edit Preset: Unlocks the presets so you can edit them; in this edit mode you can clear or select the settings check boxes and update the preset to match the settings of the current image; any changes you make to a preset in edit mode are saved automatically
•Rename Preset: Lets you edit the name of the selected preset
•Edit Description: Places the cursor in the Description box of the selected preset
•New Folder: Creates a new folder where you can put new presets
•New Job Preset: Creates a new job preset
•Duplicate Preset: Duplicates the selected preset
•Delete Preset: Deletes the selected preset
•Import Preset: Opens a file browser where you can select a preset for importing
•Export Preset: Opens a file browser where you can select a preset for exporting
NOTE: You can only add an image preset using the + button in the toolbar.
Preset filter
Enter a value in the box to search for a preset in the list; click the X button to show all presets.
Presets list
In this list you can create folders for Image presets; the first folder is the default folder and the only folder for all Job presets; image presets can be listed at the top level or one level lower in folders. Selecting an image preset displays the Image Settings of the preset in the panel on the right.
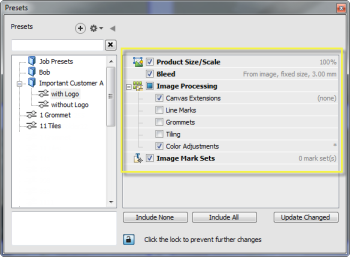
Image Settings
Theses settings in the panel on the right are only displayed if you have selected an image preset in the list. The check boxes refer to the settings you can specify for an image in the Product Editor inspectors, plus the Image Mark Sets and Color Adjustments. Color Adjustments refer to changes you made in the Preview application, i.e. saturation, contrast, curves.
Include None/Include All
Buttons are enabled in edit mode. Use them to select all or none of the check boxes and include or omit the settings as specified for the current image in the selected preset.
Update Changed
Button enabled in edit mode. Click to update the selected preset to match any changes made to the settings of the current image and which are included in your preset.
Create image presets
1 Open the image whose settings you want to save as a preset in the Product Editor. This can be an image with bleed, canvas extensions and grommets, tiling, a step & repeat pattern, etc. as specified in the inspectors.
2 Open the Presets tool.
|
3 Click the + button (Add Preset) in the Presets toolbar.
The presets are unlocked and a new image preset appears in the list at the highest level. If you want to create the preset in a folder, select the folder before clicking the + button.
4 Enter a name for your new image preset.
In the Image Settings panel on the right, select the check boxes for the settings you want to include in the preset. You can also use the Include All or Include None buttons.
5 Enter a short description for the preset in the Description panel under the list.
6 Click the Update Changed button to confirm your preset.
7 Close the Presets tool.
8 Apply the Preset to a new image to test your preset.
Apply image presets
You can apply an image preset in the Product Editor or in the Layout Editor. An existing preset can also be applied in a Layout Hot Ticket.
1 In the Product Editor, open the image to which you want to apply a preset.
2 Open the Presets tool.
|
3 Select a preset and check the Image Settings in the panel on the right.
4 Open the cogwheel menu and choose Apply to apply the settings to the image.
The image settings (bleed, canvas extensions, tiling scheme, etc.) are applied to the image.
OR
1 In the Layout Editor, select the image you want to apply the preset to in the Product panel.
2 Open the Presets tool.
|
3 Select a preset and check the Image Settings in the right panel.
4 Open the cogwheel menu and choose Apply to apply the settings to the image.
The settings are applied to the image without opening the Product Editor. You will see the result of tiling immediately in the Product panel and when you place the image on a sheet.
NOTE: If an image has already been edited in the Product Editor, the preset replaces these existing setting and adds settings which are not yet specified for the image.
Update a preset
1 Open the image which has the required settings in the Product Editor.
2 Open the Presets tool.
|
3 Select the preset you want to update and unlock the settings or choose Edit Preset on the cogwheel menu.
4 You can make further changes with the inspectors if you want and/or select or clear the check boxes in the Image Settings panel.
5 Click the Update Changed button to include the changes in the preset.
6 Apply the Preset to a new image to test your preset.
doc. version 13.1.1