Tile Marks Dialog
You can print tile-specific marks on the tiles to help the person assembling the tiles arrange the tiles correctly. Two tile marks are possible: the tile name, which is text that typically includes the sequence number, and overlap line marks for aligning adjacent tiles. Select the check boxes to include the name and/or lines.
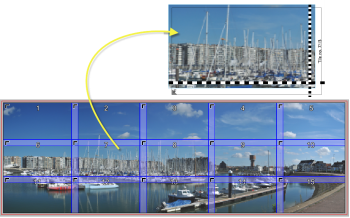 |
NOTE: Tile marks are only visible in the Layout Editor and when the image is placed on a sheet.
To print tile marks
1 You enable tile marks by selecting the Print tile marks check box in the Various panel at the bottom of the Tiling inspector.
2 Click the Edit button (pencil) to open the Tile Marks dialog box where you can specify the content and the appearance of the marks.
 |
Tile name
Text
Any combination of static text and variables can be entered in the box for the name which will typically include the sequence numbers.
For example: Tile no. $image.tile_number/$image.total_tiles resolves to Tile no. n/total. Valid variables appear in a drop-down list as you type in the box.
For example: Tile no. $image.tile_number/$image.total_tiles resolves to Tile no. n/total. Valid variables appear in a drop-down list as you type in the box.
Font
The typeface and point size for printing the text mark.
Color
Click the associated variable button, and select one or more options to determine on which plate(s) the text mark will be printed:
 |
•Registration (all plates). When this option is selected, you will see an asterisk (*).
•Process colors (CMYK)
•Darkest color
•Special colors
•Spot colors
Outline
Adds a 1-point white line in knockout around the type so it stands out better with certain content.
Position
Here you can specify where the tile name is printed on the tile by choosing one of the buttons:
•Centered in overlap: the default position which places the tile name in the center of the overlap or extension. For the tiles with no overlap, for example the last tiles, you can choose to omit the text, otherwise the tile name is printed in the visible area. You can change the default behavior as follows:
•Prefer horizontal overlap (default): if possible, the text is printed in the horizontal overlap or extension
•Prefer vertical overlap: if possible, the text is printed in the vertical overlap or extension
•In horizontal overlap only: forces the system to place the text in the horizontal overlap
•In vertical overlap only: forces the system to place the text in the vertical overlap
If the tiling scheme has no overlaps or extensions specified, the system prints the tile name along the horizontal edge of the tile, and possibly in the visible area.
•Manual: Select this button if you want more control for placing the tile name mark. Specify the horizontal (left, center, right) and vertical (bottom, center, top) alignment relative to the corners of the total size, the horizontal and vertical offset, and rotation of the text (0, 90, 180 or 270°).
Overlap (alignment lines)
The overlap marks are dashed, black and white lines that mark the border between the visible part of the tile and the overlap or extension. Tiles will have two, one or zero lines depending on their position in the montage, with small dashes for vertical lines and large dashes for horizontal lines.
Position
The position of the line relative to the edges of the tiles:
•At overlap/extension: against the bordering line of the overlap/extension
•Centered in overlap/extension:
Length
This option controls the length of the dashed line:
•Print in bleed only: This default setting prints a line in the bleed area only so it’s the smallest of the marks.
•Print into overlap: The line is printed in the bleed area and extends into the overlap or extensions.
•Print across entire size: The dashed line is printed along the entire length of the edges that have overlaps.
Thickness
Enter the thickness of the dashed lines in points (pts).
Run into image area
Enabled for the first two Length options: the length that the dashed line may extend into the image area.
Print tile line marks
You can print an outline along the edges of each tile:
•On Total Size: the tile including overlaps/extension
•On Bleed: the total size plus bleed
You can set the thickness, color and style of the line marks. Click the arrow icons to select a solid, dashed or dotted line.
doc. version 13.1.1