Applying Changes and Submitting a Job
Applying Changes
If you change settings that modify the color rendering of the products (e.g. preflight, calibrated printing mode), the Apply Changes button appears in the amber status box in the bottom right corner. You can choose whether you want to apply your changes or not because this may take considerable time and interfere with your work.
 |
NOTE: Applying changes does not create new previews of products already added. See “Product Previews”.
Submitting a Job
After placing your products on the sheet, reviewing the print layout, and completing the job set-up, you can submit the job by clicking the Submit Job button in the bottom right corner. Submitting a job also creates previews if you chose not to generate previews while preparing the job.
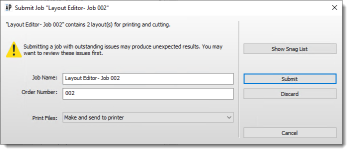 |
The Submit Job dialog box displays the Job name, Order number and the following options that you can choose:
Print Files
Hold
The job appears in the Jobs list but no files are processed.
Make and hold
The files for the printing device are processed but not sent to the printing device.
Make and send to printer
The files for the printing device are processed and sent to the printing device.
Cutter Files
Hold
The cutting files are not sent to the cutting device.
Make and send to printer
The cutting files are processed and sent to the cutting device.
Show Snag List
When you want to submit a job that has warnings, Layout Editor asks you to confirm the submission. Clicking the Show Snag List button closes the submission dialog and opens the Snag List. The Snag List shows conflicts (errors and warnings) relating to the products in the Product panel or the placement of products on the sheet. See “Snag List” for more information.
Submit button
Click the Submit button to confirm your changes to the job. The Layout Editor closes and the actions you selected for the print files and cutter files are executed. The job is updated in the Jobs list.
Discard/Delete Job button
If the job has not yet been submitted you will see the Delete Job button. Clicking this button will delete the job. If the job has already been submitted and you were making additional changes to the job, you will see the Discard button. Clicking this button closes the Layout Editor without saving your changes to the job.
Cancel button
Click the Cancel button to return to the Layout Editor without confirming your changes.
DQS Indicator
The DQS indicator is visible in the bottom right corner if DQS, or Digital Quick Strip, is enabled. The indicator informs whether DQS is active and at what level (product or sheet). Hover over the indicator to see the status tooltip.
The DQS feature is enabled automatically if duplicate content is found in the job. If the same product is placed multiple times, it is quicker to render it once and then compose the raster data.
Image DQS (green)
This level of DQS renders the product once.
Sheet DQS (yellow)
This level creates and renders a Print Layout as a collection of Sheet Layouts.
DQS not possible (white)
DQS is enabled but not beneficial.
No DQS (red bar)
DQS is switched off although it is available.
Automatic
The system has determined that DQS should be enabled.
NOTE: The printer may also have a DQS option.
doc. version 13.1.1