View Options
The Press Sheet view opens with a single Press Sheet displayed. By default, you will see the Front or Back of the Press Sheet depending on which side you selected. You can also view the reverse side of the Press Sheet with the Light Table tool.
1 Text Mark 2 File Mark 3 Press Sheet Box 4 Press Sheet Margin 5 Fold Sheet Box 6 Page Box 7 Page Bleed 8 Fold Sheet Gutter 9 Gripper 10 Fold Sheet Lay 11 Press Sheet Lay 12 Overfold | 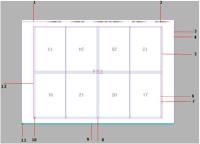 |
The View Options palette in the Press Sheet View is used to show and hide the various rule-ups. For example, this allows you to inspect overlapping rule-ups.
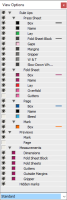 |
The rule-ups are divided into the following categories:
•Press Sheet Rule-Ups
•Box: the bounding box around the Press Sheet
•Name: the Press Sheet name
•Lay: triangle icon indicating lay of the Press Sheet
•Fold Sheet Block: the area enclosing all Fold Sheets
•Gaps: the space between Fold Sheets/elements
•Margins: the margins, except the gripper
•Gripper: the Gripper area of the Press Sheet as set for the Press
•W&T: the mirrored part of a Work and Turn or Work and Tumble sheet
•Slow Down Wheel Lanes: the positions of Slow Down Wheel lanes
•Fold Sheet Rule-Ups
•Box: the bounding box around the Fold Sheet
•Name: FS1, FS2, etc. in the middle of the Fold Sheet
•Lay: triangle icon indicating lay of the Fold Sheet
•Overfold: extra area for finishing machines
•Gutters: the no-content area
•Page
•Box: the bounding box around the Page; Name: the Page numbers
•Name: the page numbers
•Bleed: shows the bleed area on the Page
•Mark Box: the bounding box around the Text Mark and File Mark
•Previews: shows the content of marks (e.g. colorbars) and high resolution page thumbnails
•Measurements: shows fixed measurements of the Press Sheet and its components, the margins and the gutter; does not affect custom measurements
•Hidden Marks: marks that will not be printed due to conflicts; displayed in a red, hatched box
•View Options Sets drop-down list: choose, create, rename or delete preference sets for the View Options
To show/hide rule-ups and hidden marks
1 Click the Show/hide View Options button in the Toolbar or choose Window > View Options to show the View palette.
 |
2 Click the individual or group eye icons to show or hide the various rule-ups and marks.
3 Click the colored boxes to open a color editor where you can change the color of the rule-ups and measurements.
4 Click in the drop-down list at the bottom of the View Options palette to choose, create, rename or delete preference sets for the View Options.
doc. version 13.1.1