Merging Jobs
Apogee allows you to merge any number of jobs in the Job List into a single merged job. This is particularly useful for ganging the products of several smaller jobs into a larger job. You can combine multiple jobs with bound and/or unbound products into a merged job. Merged jobs are by definition multi-product jobs. The Apogee Impose module can be used to place the parts of the different jobs on the press sheets of the merged job.
The Origins of Merged Jobs
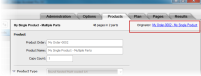
The relationship between a merged job and the originating jobs and products is displayed in the top right corner of the Products tab as a property of the selected product. For merged jobs, the link indicates the order number and job name of the original job (originator). For jobs that have been merged, the link indicates the order number and job name of the merged job. Clicking these links highlights the job in the Job List.
 |
Unsupported Jobs
The following conditions must be met in order to merge jobs:
•A job to be merged must not be a multi-product job, in other words it should only have one product.
•A job to be merged must not have versions (versioning job).
•A job which has already been merged and a merged job cannot be used as one of the jobs to be merged.
•It is not possible to merge regular, non-layout jobs with layout jobs.
Otherwise you are free to combine bound and unbound jobs with different properties (presses, colors, media) and the Merge Assistant helps you collect and merge suitable jobs.
NOTE: The imposition settings for the individual products are maintained in the new merged job.
To merge existing jobs
1 In the Job List, select the jobs you want to merge into a single merged job by pressing CTRL and clicking the jobs.
You can select job folders or individual jobs within a folder. If you select folders, all the jobs in the folder are included in your selection for merging.
2 Context-click in the blue, highlighted area and choose Merge Jobs.
The Merge Assistant is displayed.
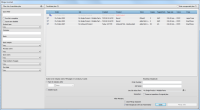 |
The selected jobs are listed with their details. Jobs which cannot be merged (unsupported) are grayed out and the product type is displayed in red in the Product column.
Unsupported jobs (e.g. multi-product and versioning jobs) can be hidden in the list by selecting the Hide unsupported jobs check box.
3 If necessary, fine-tune the list of jobs you want include in the merged job. You can sort the jobs by column and choose the most appropriate jobs to be merged by Press, Stock, Media, etc.
You can select multiple jobs in the list and click one of the check boxes to clear them from the list, or to include them in the merging.
The properties in the columns are also available in the Filter panel on the left. Either type in the Quick Filter to filter on the Order Name and Job Name, or choose/combine with any of the other filters. You can save your filter by choosing Set As Default in the cogwheel menu (top right corner of the Filter panel). You can revert to this filter at any time by choosing Revert in the same menu.
A summary of the jobs you are going to merge appears at the end of the table. If you want the system to delete the jobs to be merged, select the Mark for deletion after check box and enter the number of days/months before the jobs are deleted. You also have a Disable inputs check box that allows you to queue documents that are input for jobs to be merged.
NOTE: If you selected a mix of regular jobs and layout jobs, you will see two radio buttons (non-layout jobs and layout jobs) forcing you to select either one of these job types. It is not possible to merge regular, non-layout jobs with layout jobs.
4 In the Resulting merged job panel, you specify the details for the new merged job:
By default, the first supported job ticket in the Candidate Jobs list is used to create the new job. If you want to use a different job ticket, click the cogwheel button and choose another job from the drop-down list.
OR
Click the cogwheel button and select a Ticket Template. The Templates dialog is displayed and you can choose a job ticket template. Click Select to return to the Merge Assistant.
5 Enter the Order Number and Job Name for the new, merged job to activate the Merge Jobs button.
6 Select the Preserve imposition of original jobs check box if you do not want the Merge Assistant to change the existing impositions.
7 Click Merge Jobs.
If you didn’t clear the Edit merged job with Job Ticket Editor check box, the Job Ticket Editor opens and you can complete the job set-up, including imposition with Apogee Impose. If the merged jobs had documents, these documents are added to the merged job. The Comments box in the Administration tab lists the jobs merged to create the merged job.
The Merge Assistant window remains open but the merged jobs are removed from the list. If you want to close the Merge Assistant after merging, select the Close Merge Assistant check box before clicking the Merge Jobs button.
8 Submit the new merged job.
The merged job is added to the Job List. The original jobs and the merged job are indicated with a special status icon:
 | A job that has been merged | |
 | A merged job: The job resulting from the merging of two or more other jobs. |
9 In the Merge Assistant, click Close to finish merging or repeat the merging procedure to merge another batch of jobs in a second merged job.
doc. version 13.1.1