Comparing Results
The Raster Compare feature lets you compare the results of two jobs with each other. This is particularly useful for security printing applications where you may need to check extremely small differences in the raster data. The feature can also be used in regular commercial printing environments to compare the difference between previously rendered data and the latest result.
You start the Raster Compare using the Compare palette, and you can also use the Inks palette to compare ink coverage in the two images.
NOTE: You cannot compare with a job archive result.
Compare the results of two jobs
1 Open the first page or flat you want to use for the comparison.
2 Choose Window > Palettes > Show Compare to open the Compare palette.
The current image you are viewing is image A of the comparison and the job name and signature are specified at the top of the palette.
3 Click the browse button on the second line to choose the preview data you want to compare the current image with (image B or reference image).
4 Select the reference job (image B) in the list on the left; if the list is long, use the filter.
The available Results for the selected job are listed on the right.
5 Choose the Results you want to compare with and click Open.
A blue progress bar is displayed as the system compares the two images, and the reference image is now specified on the second line in the palette.
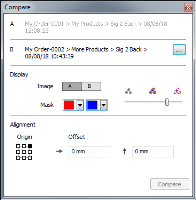 |
6 A mask for each image shows the pixels which are only in the respective image. In the Display panel, moving the slider to the right increases the intensity of these masks and hides the actual image. You can alternate between both images by clicking A or B. You can change the color of the two masks by clicking the patch and selecting another color in the picker.
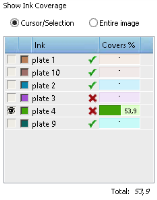
7 In the Inks palette, you can check whether the ink coverage for the two images is the same (indicated with a green check mark) or not the same (indicated with a red cross).
 |
8 In the Alignment panel you can enter positive or negatives values (Offset) to move the reference image (image B) horizontally and/or vertically and align the images. You can choose a reference point (Origin) to apply the offset.
NOTE: When you’ve finished comparing and close the Preview window, none of your alignment changes are saved.
doc. version 13.1.1