Measuring Screen Angles
This section describes how to measure screen angles. This helps you to avoid unwanted moiré effects in your final output.
To measure screen angles
1 Select the Preview window which contains the image you want to measure.
2 Select the Measurement tool.
 |
TIP: You need to select a good pattern to achieve useful results.
3 Click a reference point inside the Preview window and drag the mouse pointer to another position in the window.
As you move the mouse, Preview automatically calculates the distance and angle between the point where the mouse button was pressed and the current mouse position. Distances are measured in the units you have specified.
NOTE: If you press the Shift key while dragging the mouse, the direction of the line you draw will be restricted to a horizontal, vertical, or diagonal direction.
A line connects the start and end reference points. The distance between the reference points and the angle of the line are displayed in the status bar.
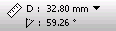 |
•The first of these two values indicates the actual distance between the two points, in the user-specified units.
•The second value indicates the screen angle between the two points, expressed in degrees.
The angle is measured counterclockwise from the zero angle reference axis through to the starting point (i.e. the point you started dragging the mouse). If the value is greater than or equal to 180, the read-out will be decremented by 180.
To the right of the displayed values in the status bar, you will see some additional measurements.
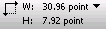 |
•The first of these two values indicates the horizontal distance between the two points, in the user-specified units.
•The second value indicates the vertical distance between the two points, in the user-specified units.
NOTE: By default the unit of measurement for the above fields is taken from your Preferences.
doc. version 13.1.1