Saturation, Contrast and Channel Adjustments
NOTE: This feature only applies for jobs using the M-Press Task Processor and only on clients with Windows.
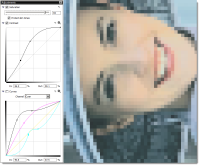
The Adjustments palette has three panels with the following tools to adjust rendered results:
•Saturation slider: The slider has a range from -100 to +100 with a default value of 0 as the neutral setting. You can apply an adjustment by selecting the check box and dragging the slider, clicking in the slider path or entering a value. The Protect skin tones option lets you disable the saturation adjustment for skin tones.
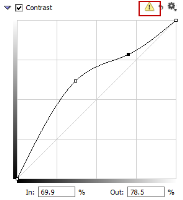
•Contrast adjustment curve: This adjustment controls the luminance of the rendered result which can range from 0% (black) to 100% (white). The plot area consists of a horizontal In axis and a vertical Out axis, and a diagonal baseline where the In and Out values are the same. The baseline is black if no adjustments have been applied and changes to gray once you begin to make adjustments. Drag any point on the black baseline or curve to make adjustments. You can also choose an adjustment preset by clicking the cogwheel and selecting a preset you defined in the Contrast Adjustment resource for this particular device. Make sure the Contrast check box is displayed to see the effect on the sheet.
•Channel adjustment curves: These curves control the CMYK ink coverage of the device within a range of 0% (no ink) to 100% (full coverage). The plot area consists of a horizontal In axis and a vertical Out axis, and a diagonal baseline where the In and Out values are the same. Choose the channel that you want to adjust from the drop-down list (Cyan, Magenta, Yellow, Black) to activate one of the four channel curves. Drag any point on the curve to make adjustments. You can also choose an adjustment preset by clicking the cogwheel and selecting a preset you defined in the Curve Adjustment resource for this particular device. Make sure the Curves check box is displayed to see the effect on the sheet.
 |
You can revert to the initial values by clicking the revert button.
A warning icon is displayed when you make adjustments and these adjustments cannot be shown in the current preview mode.
 |
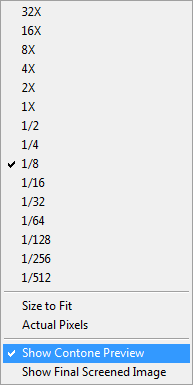
Switch to Contone Preview using the zoom level menu to see the effect of the adjustments on the sheet.
 |
doc. version 13.1.1