Pagination Schemes Overview
Pagination Schemes list
In this list you see default Pagination Schemes and any new or modified schemes you have created.
CxR
Abbreviation for Columns x Rows; e.g. 4 x 2 means 2 rows of 4 pages.
Pagination Scheme Settings
Name and Description
Enter a meaningful name, such as ‘leaflet’, ‘flyer’, ‘letter, etc., and a description.
Sides
The default is single-sided; select the check box if you want to create a double-sided scheme; the schemes are filtered on this setting when choosing a scheme in the part editor.
Columns and Rows
Columns indicate the number of horizontal cells and Rows the vertical cells of the page arrangement grid as shown in the Page Assignment pane below.
Copy from
Click this button to copy a page arrangement from a folding scheme. The columns and rows are filled in accordingly. This can be useful as a starting point for a new scheme.
Page Assignment
In this pane you see the part as an arrangement of panels in a grid with the number of rows and columns specified above. Use the arrangement buttons to enter the page numbers.
NOTE: Pages can be assigned arbitrarily so no page numbers are added automatically to the Top or Bottom of the pagination scheme.
Pagination Scheme grid
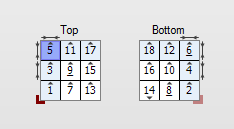 |
1 Blue page: Panel selected with pointer button 2 Measurement arrows: panel size has been changed 3 Light blue cells: these are affected by the modified panel size 4 Grey triangle icon: page orientation 5 Page nos. with underscore: ambiguous page nos.: 6, 9, 8 6 Red corner icon: Lay on Front 7 Red corner icon (faded): Lay on Back |
Arrangement buttons
 | pointer button for selecting a panel in the grid | |
 | cursor button for typing the page numbers on the pagination scheme; you must start with 1 and increment by 1, otherwise the scheme is invalid | |
 | pointer button that inserts incremental page numbers on the pagination scheme | |
Reset | resets the scheme and empties the cells |
Change panel size
This option is active when you select a page using the pointer button and you can use it to change the size of individual pages or panels. This option can be used to reduce the size (enter negative values) of the panel or increase the size (enter positive values). A modified panel size is indicated in the page arrangement grid with measurement arrows.
NOTE: Changing the size of one panel may affect the entire row or column, also on the other side of the sheet. The affected panels are indicated in light blue.
The values are applied to modify the actual page size as defined for the part in the job ticket editor.
Page orientation
Select a panel with the pointer button and rotate the page by 180 degrees. This does not affect the orientation of the panel on the other side of the sheet.
doc. version 13.1.1