Media Hub
 |
The Media Hub is where you manage Calibrated Printing Modes (CPMs). CPMs are presets that you can select in the Layout Editor to obtain the best possible printing results for the selected printing quality, press and media on the specified printing device.
Associated Task Processors
The Finishing Hub is available for the following Task Processors:
•Generic SD (Sign and Display Printer) and other SD printers
Open the Media Hub
Administrator access level only! Select a printing device in the System Overview and you will see that the Media Hub is a resource.
You can select a CPM in the list of Calibrated Printing Modes. You can use the filter box to filter the CPMs by printing device for example.
Create a CPM
New Calibrated Printing Modes are generally based on a default CPM, but you can also create them from scratch.
The CPM Creation Wizard opens.
The wizard consists of 3 steps. Visit the Tutorial page on the AsantiNetwork for a detailed procedure.
Media Hub Overview
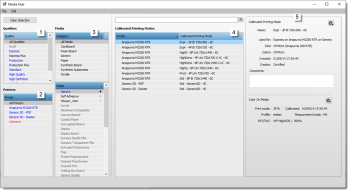 |
1 Quality
2 Printer
3 Media Category and Media
4 List of Calibrated Printing Modes (CPMs) for the selected quality, printer and media
5 Details of the selected quality, media or CPM, or adjust Printer Parameters for category
A series of base or default CPMs are included with your system and new CPMs can be created based on these CPMs. You can see the default CPMs if you select All Qualities + All Printers + Generic Media (in the All Media or Generic Media).
When you start a job in the Layout Editor, you need to choose a Calibrated Printing Mode (CPM) that corresponds with the requirements of the job. A number of CPMs are available for each printing device (Anapurna, Jeti, etc.) to ensure optimum printing results on each device. The CPM settings take into account the following parameters:
•Quality: The Quality parameter allows you to choose a desired quality level for the printed product. The quality level you choose depends on the characteristics of the images to be printed, the desired color gamut, the viewing distance and the printing speed. The following quality levels are available:
•Express
•Express Plus
•Production
•Production Plus
•Standard
•High Quality
•High Definition
•High Density
•Custom
•Printer: A particular printing device cannot necessarily handle all quality levels. Only the quality levels that apply for the available printing devices are shown when you set up a job.
•Media: The expected quality varies according to the chosen media.
•Clear Selection: This button resets the selection to All Qualities, All Printers and All Media.
Calibrated Printing Modes Details
General
The name and properties of the Calibrated Printing Mode.
Color On Media
The printing mode and color mode for printing the process color inks directly on the substrate, and the associated calibration and characterization resource. This applies when printing without white, or when printing with post-white, regardless of the kind of white application.
Color On White
The same set of properties for printing the process color inks on white ink.
White
The print and screen properties for printing white.
CPM cogwheel menus
•Calibrate: Opens the CPM Calibration Wizard.
•Update G7 Calibration: Only active if the CPM includes a G7 calibration step. Use this option to update this step.
•Tune Profile: Opens the CPM Profile Tuning Wizard.
•Edit Profile Settings: Opens the Edit Profile Settings dialog
•Redo CPM Setup Wizard: Launches the wizard to redo the calibration wizard.
•Revert Calibration: Opens the Revert Calibration dialog where you can choose a calibration date to revert to.
•Revert G7 Calibration Update: (Only active if the CPM includes a G7 calibration.)
•Revert Profile: Opens the Revert Profile dialog where you can choose a profile date to revert to.
•Revert Edit Profile Settings
•Revert Redo CPM Setup Wizard
•Report: Opens the CPM Quality Report. You can save the report as a PDF or print it.
•Export Profile: Exports the profile.
•Print Mode Parameter: Opens the Edit Print Mode dialog.
Media Details
General
Name
How you want to call the media.
Sheet only
The media can be used on flat-bed or hybrid printers.
Roll only
The media can be used on roll-to-roll or hybrid printers.
Both
The media can be used on any type of printer.
Default thickness
The default thickness of the media.
Categories
One or more categories that the media belongs to. Select the categories from the drop-down list.
Media Calibration
Here you can choose whether the new media needs a dedicated CPM, or can use that of an existing media by choosing one from the drop-down list.
Create New Quality
A new quality is added to the list. You can edit the Name, Short name and Description in the Quality details panel.
Create New Media
A new media called Media is added to the list. You can edit the name and specify the settings in the Media details panel.
Other Media Hub Commands
Configure Printer
NOTE: Depends on access level.
Manage Sheet Sizes
The Sheet Size resource is displayed. See “Sheet Sizes”.
Import/Export CPMs
The file browser is displayed.
NOTE: Many of these commands are available by context-clicking the appropriate item.
Adjust Printer Parameters
doc. version 6.1.1