Create Grid
Create/Edit Grid feature allows you to create a grid or modify the existing one using the Create/Edit Grid commands. The Layout Editor numbers the frames in the grid according to the row/column based order and the last used numbering scheme.
Select a product in the Product panel and open the Create Grid dialog box as follows:
OR
Context-click the selected products and choose Arrange > Create Grid.
Create Grid Dialog Box
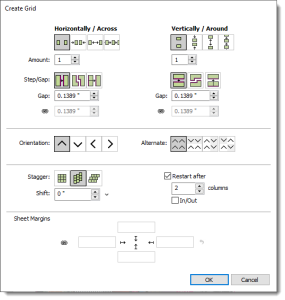 |
Crate/Modify Grid dialog box consists of the Row/Column layout, Orientation, Staggering and Sheet Margins options.
Row/Column Layout
Horizontally/Across
Vertically/Around
Vertically/Around
Select the arrangement of the frames: Manual, Center, Distribute, or Repeat:
•Manual: Place the specified amount of frames with the specified gap/step
•Center: Place as many frames as possible and center
•Distribute: Place as many frames as possible and spread out
•Repeat: Place as many frames as possible for continuous printing
Amount
The number of frames in the first row or column.
Step/Gap
Select how to specify the distances between two adjacent frames: Gap between bounding boxes, Gap between contours or a Step size. When you change the mode, the Layout Editor displays the corresponding gap value(s).
•Gap between bounding boxes: Specify the minimum distance between the frames
•Gap between contours: Specify the minimum distance between the contours
•Step size: Specify the minimum step size
(Minimal) Step/Gap
The sizes of the odd and even gaps or steps.
NOTE: The caption changes depending on the selected fill mode and step/gap mode.
Link icon
The link icon keeps the odd/even values in synchronization. Click the link icon and re-enter values if you want to specify different values for the odd/even values.
Orientation
Orientation
Select the orientation of the first frame. The Up orientation is the current orientation of the selected frame, regardless of its actual rotation (or mirroring).
Alternate
Select whether to alternate the orientation for rows and/or columns:
•All the same: Keep the orientation the same in all rows and columns.
•Alternate rows: Rotate the even rows by 180 degrees.
•Alternate columns: Rotate the even columns by 180 degrees.
•Alternate both: Rotate all even rows and columns by 180 degrees. Stations that are in an even row and even column have the same orientation as the first.
Staggering
Stagger
Select whether to stagger and in which direction: No Stagger, Stagger Vertically/Around, or Stagger Horizontally/Across.
Shift
Specify the how far to shift the next row or column. You can use an absolute value or a value that is relative to the frame’s size, either as a ratio (e.g., 1/3 ) or as a percentage (e.g., 25%). Shift is disabled, when staggering is off.
Restart after
Select the check box to restart the staggering after a specified number of columns or row. It is disabled when staggering is off.
Restart value and unit
Select the value to restart shifting the column/row. If you specify a value which is larger than the current number of frames, there will be no restart. The unit is displayed either in columns or rows, depending on the stagger direction.
In/Out
Select whether to reset the shift and then start shifting again, or to shift back until the original position is reached.
Sheet Margins
This section displays the top, bottom, left and right sheet margins. The link icon keeps all the sheet margins in synchronization. Click the link icon and re-enter values if you want to specify different margins. When you close the link icon, the left margin value is copied into the other margins.
doc. version 6.1.1