Sheet Layout Templates
Sheet layout templates help you apply a standard sheet layout to several sheets in the same job or to the sheets of different jobs. A template consists of empty frames that are used as placeholders for arranging products on the sheet.
A template applies the following settings to the current sheet:
•The width and height of the Sheet
•The frames on the sheet and their properties; embedded designs, associated products, Fitting Options, orientation and mirroring, location and size, Content ID and Station number
•Frame groups and their properties; Grids. CAD layout groups. regular frame groups
•The special mark(s) that holds the non-product CAD-lines
•Manually added Image and Sheet marks
•Altered Sheet and Image-mark sets. These are mark sets that have any of the following alterations; forced activation state, removed marks, modified marks
•The bleed mask of front and back, if present
•Products that are associated with the frames on that sheet, and their associations; the design, if present, manually drawn paths and their operation assignments, such as ink-free zones, manually placed Product marks, all image operations, all Guidelines.
Create a template from an existing sheet with placed products
You can create a sheet layout template by saving a sheet that you prepared for a particular job. This will probably be a layout with placed products. Saving as a template removes the products and creates a layout with just the frames.
1 Go to the sheet that you want to save as a template and select the Sheet Size.
Make sure all the settings for the individual frames are fine-tuned.
2 Choose Sheet > Save Sheet Layout Template.
3 In the dialog box, enter the following information:
•Name: type a descriptive name for the template
•Categories: assign a category or enter a new category
•Assign Content IDs: Select this check box to name the frames on your template. If the frames of your layout contain products, each frame is assigned a unique content ID but frames that contain the same product are assigned the same ID.
NOTE: If the layout contains a combination of named and unnamed frames, the IDs of the named frames are used for the named frames and the unnamed frames are not assigned an ID.
 |
4 Click Save.
The dialog box closes and you can continue working in the Layout Editor. If you want to check that your template has been saved, follow the procedure to apply a template and you will see your new template in the list of templates. If you want to check that your template has the desired frames and content IDs, apply the template to a new layout sheet.
NOTE: Your sheet must have at least one product or frame, otherwise the template is not saved and will not appear in the list of templates.
Figure 3.14: A sheet with placed products saved as a template with content IDs
 |
Apply a Sheet Layout Template
CAUTION: Applying a sheet layout template erases all the placed products and frames from the current sheet. In other words, the template is applied to the sheet, not to its content.
1 On the current sheet or a new sheet, choose Sheet > Apply Sheet Layout Template.
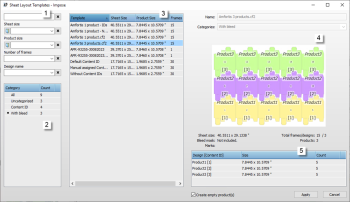 |
1 Filter Panel 2 Category Filter 3 Template List 4 Attribute Panel 5 Design List |
The Filter Panel shows the attributes that you can use to filter the list of templates. You can search for the Name, Sheet size, Product size, Number of Frames, and Design name.
The Category Filter is a list that shows all categories from the templates that match the filter, sorted by ascending alphabetical order.
The Template list shows the templates that match all filters.
The Attribute panel shows the attributes of the selected template:
•When you’re saving a sheet, the Attribute panel shows the attributes of the sheet being saved, as it will be saved as a Sheet Layout Template.
•When you’re managing Sheet Layout Templates or applying a Sheet Layout Template, the Attribute panel shows the attributes of the template that is selected in the Template list.
The Design list of shows a list of combinations of designs and content IDs, together with the size and count of each combination.
Create empty product(s) check box allows to place products immediately on the Sheet Layout, when you import new products via the Add Artwork context menu option (for the Empty products).
NOTE: As the Product Marks and Ink-Free zones (User paths) are defined on the Products, you need to enable the Create empty product(s) in order to have the marks and zones applied.
2 Select the template you want to use and click Apply or double-click it.
3 The sheet now has the size as specified in the template and all the frames are empty, except for product marks that you may have added.
 |
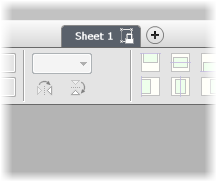
1 Empty frames with Content IDs 2 Lock icon in sheet tab 3 Button to unlock/lock a sheet in the Product Inspector 4 Image marks |
4 The lock icon next to the Sheet tab label indicates that the sheet is locked which means that you cannot change the layout without unlocking it.
 |
5 Now you can start placing products on the layout and submit your job.
6 If you want the same layout for another sheet in the same job or another job, you can apply the template again.
Create a sheet layout template from scratch
Edit/Rename a sheet layout template
Delete a sheet layout template
Locking/Unlocking a Sheet
When a sheet is locked, you cannot modify the number of frames on the sheet, the position of frames, or the size of the frames. It is possible to change the Fitting Options and the Content IDs.
|
Sheets created from a template are locked by default as indicated by the lock icon in the Sheet tab label.
1 On the sheet that you want to lock/unlock, go to the Sheet Inspector.
2 Click the lock icon the lock/unlock the sheet.
 |
Importing/exporting templates
doc. version 6.1.1