Placing Products with Auto-Layout
The Auto-Layout feature places and arranges all the selected products automatically on the sheet according to the chosen layout strategy. The products are placed on all the sheets of the job, including locked sheets.
CAUTION: Products already placed on sheets are cleared, even if the sheet is locked.
Select one or more products in the Product panel and open the Auto-Layout dialog box as follows:
OR
Context-click the selected products and choose Auto-Layout Products.
NOTE: If no products are selected, Asanti auto-layouts all the products in the Product panel.
Auto-Layout Dialog Box
Size
Media size
By default, the size of the media as defined in the job set-up. Choose a size from the drop-down list or enter a custom size. You cannot change this if you have already placed products on a sheet.
Products
Copy Count
Here you can set the number of copies you want to print of each placed product. Asanti calculates the number of sheets that need to be printed to obtain the entered copy count. See “Sheet Inspector”.
Layout
Here you specify the layout strategy.
Type
Selecting a layout type shows options which are specific to each type.
True-Shape Nesting
to nest products more intricately based on the cutting path of each product.
Rectangular Nesting
to nest products in an intricate layout that may not be suitable for guillotine cutting.
Guillotine Cuts
to nest products in a sheet that is suitable for guillotine cutting.
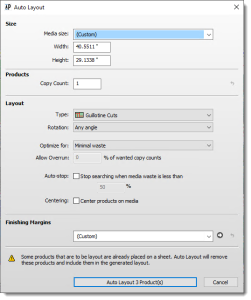 |
Rotation
It’s possible that more products can be arranged on the sheet by allowing Asanti to rotate them. Choose one of the following:
None
No rotation is allowed. Places the products in their original orientation.
90 degrees
Rotates the products sideways to the left (90 degrees).
180 degrees
Turns the products upside down.
270 degrees
Rotates the products sideways to the right (270 degrees).
90 or 270 degrees
Rotates the products sideways to the left (90 degrees) or to the right (270 degrees).
0 or 180 degrees
Keeps the products at their original orientation or turn them upside down.
Any angle
Allows to rotate the products when that yield a better fit. You cannot control in which direction they are rotated. This option rotates products to meet the grain/flute requirements. If rotation is needed, it rotates the product by 90 degrees counter-clockwise.
Optimize for
Choose whether you want the fitting strategy to reduce waste or reduce the number of sheets:
Minimal waste
Reduces the waste (including the overrun, treating off-cut as non-waste).
Minimal sheets
Reduces the number of different sheets, at the expense of producing a little overrun.
Single sheet
Places all products on a single sheet, using the copy counts of the products as a ratio. This method may produce more waste or overrun.
Single sheet per layout
Places as many copies of a single product on a single sheet. As such, there will be as many sheets as there are products. This method may produce more waste or overrun.
Allow Overrun %
Allows you to set a percentage for the number of extra copy counts to achieve the chosen fitting strategy.
Auto-stop
Asanti stops searching for the best arrangement once the specified waste level is obtained (default is 50%).
Centering
Select to center the resulting product block on the media.
Finishing Margins
In this panel you can change the default finishing margins, i.e. the spacing between products and the edges of the sheet, as defined in the job set-up. See “Finishing”.
Auto-Layout Progress
This dialog box is displayed when you click the Auto-Layout button and it shows the progress of the auto-layout process. If the layout is complex and the system requires a lot of time to arrange the products, you can click the Use button to accept the Best solution so far. Otherwise, wait until the process is complete and the Auto-Layout Progress dialog box closes. The longer you wait, the better the proposed sheet.
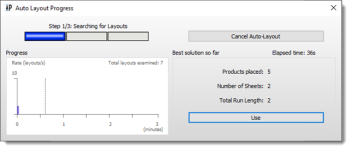 |
Progress
The diagram shows the total number of layouts found so far.
Best solution so far
The proposed number of sheets and the total run length to accommodate the fitting strategy and your copy count as best as possible.
Elapsed time
The elapsed processing time to search for possible layouts.
Auto-Layout Progress Steps
The complete Auto-Layout process can be represented in three different steps. Each step clearly marks if something is available that can be ‘used’ for the next step.
•Step 1 - Searching for Layouts: This step generates different combinations of products and examine whether that combination can be fitted onto a sheet, by taking into account the requested copy counts, adjusting some copy counts to allow more and better combinations. Every combination is examined. When a combination is successful, Auto-Layout shows it as a possible candidate, and continues searching for a better one. As soon as a candidate layout is found, Auto-Layout shows some information and enables the Use button. When you click it, or press the Enter key, process stops searching for alternative layouts and moves to the next step. If the candidate layout matches the criteria, Auto-Layout process immediately proceeds to the next step with that layout.
•Step 2 - Optimizing Layouts: Once a layout has been found and accepted, Auto-Layout process tries to compact the layout to provide more off-cut. If the current solution is acceptable, Auto-Layout automatically proceeds to the next step. If you consider the gain to be good enough, you can then click the Stop Optimizing button, or press the Enter key.
•Step 3 - Finalizing: This last step checks and adjusts the clipping paths between the products that have overlapping bleed.
doc. version 6.1.2