Job Types and Approval Flows
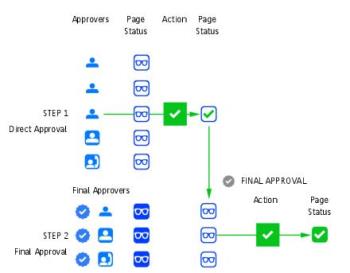
Pages which are ready to be inspected can be approved or rejected by one user or multiple users (for Multi Approval jobs) with the Approver role. If final approval is allowed and one or more Final Approvers are assigned to a job, then this job must be approved by one of these users before it goes to the production step.
Two types of jobs are possible:
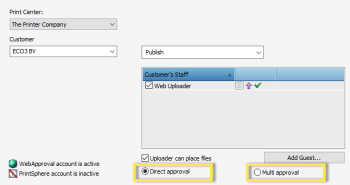
NOTE: Multi Approval option requires a special license.
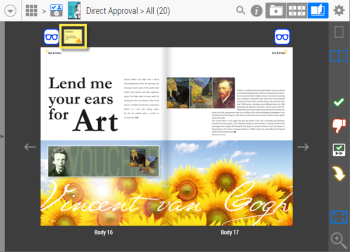
Direct Approval Job
Legacy approval workflow is now known as Direct Approval. Direct Approval is assigned by default in Apogee Prepress while creating a new job. WebApproval allows you to select the approval type when you create a new Job Ticket based on the predefined templates. See “Create a new job from a Job Ticket template”.
 |
In a Direct Approval job, a page is approved when one approver assigned to that job (there may be more than one approver) has approved that page.
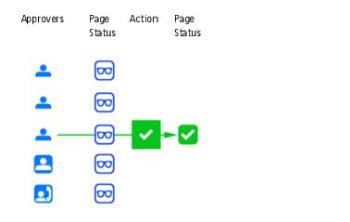 |
In a Direct Approval job, the page status always displays the job status.
 |
NOTE: Direct Approval jobs can also be set up with Final Approver(s). See “Final Approval”.
Multiple Approval Job
In a Multiple Approval job, a page is approved when all approvers assigned to that job have approved that page.
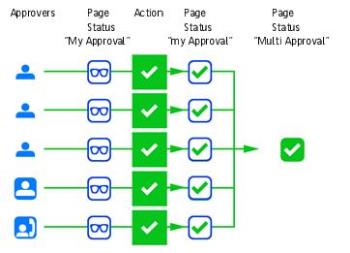 |
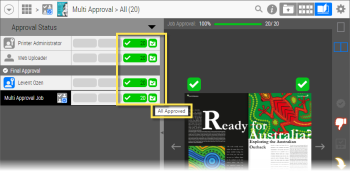
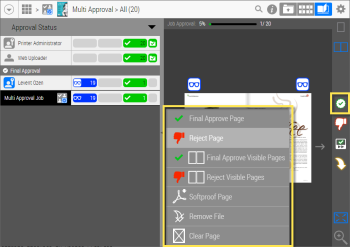
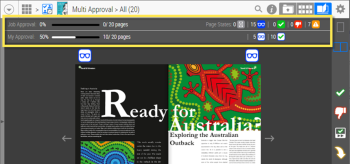
A Multiple Approval job has a set of page statuses for each Approver as well as a general Multiple Approval Job status. You can track the approval status of the Multi Approval jobs by the following two Palettes:
•Approval Overview Palette: shows the approval status at page level for each user assigned to this job. See “Approval Overview Palette”.
•Approval Status Palette:shows the overall job status with interactions for each user assigned to this job. See “Approval Status Palette”.
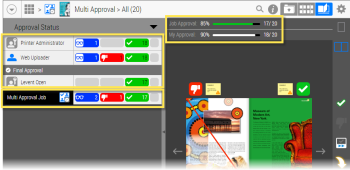 |
The job's status will become All Pages Approved, when all Approvers assigned to this job have approved every page.
 |
Final Approval
Final approval is a step to obtain a final approval for the pages before they are sent to production. To initiate the final approval for a job flow, you just need to assign Final Approver(s) to the job. If there are multiple Final Approvers, only one of them needs to provide the final approval for a page.
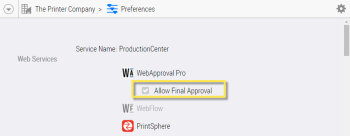
NOTE: You must enable the "Allow Final Approval" option in the Printer Company's preferences if you want to use the final approval flow. See “Preferences” and “Print Buyer Company Settings”.
 |
 |
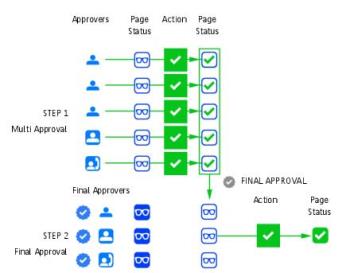 |
Once a page has been approved, the Final Approvers will receive a notification and see the status Ready for Final Approval. It is the responsibility of the Final Approvers to take action at this stage. By providing final approval for a page that is in the Ready for Final Approval state, the page will receive an updated status icon indicating Final Approval has been granted.
 |
Approval Flow Icons
Approval flow icons show the selected approval flow of the job; Direct Approval, Multi Approval, and final approval combinations. They also represent the roles of the logged in user, whether the user has a specific role assigned to the job (with white, blue outlined icons), or has no active part (the gray areas on the icons). A tooltip appears when hovering your cursor over an icon.
Approval flow icons are displayed in the Job Tile view, Job List view and in the Job Window positioned before the job thumbnail.
 | Direct Approval Job | |
 | You are approver of this Direct Approval Job. | |
 | Multi Approval Job | |
 | You and others approve this Multi Approval Job. | |
 | Direct Approval Job with Final Approver | |
 | You are approver. Somebody else will final approve the job. | |
 | You are a final approver of this Direct Approval Job. | |
 | Multi Approval Job with final approval | |
 | You and others approve this Multi Approval Job. Somebody else will final approve the job. | |
 | You are final approver of this Multi Approval Job. |
Page Status Icons
In order to indicate user page interactions, new Ready to Inspect and Approved page states are introduced.
Status Icon | Name | Description |
|---|---|---|
 | Ready to inspect by me | In a Direct Approval job, this page needs to be inspected, you are allowed to inspect and approve the page. In a Multiple Approval job, this page needs to be inspected and approved by somebody else. |
 | Approved by me | This page is approved by you, but still needs to be approved by other Approvers. |
 | Ready to inspect | This icon is shown to all users who do not have an Approver role. |
 | Approved | This page is approved by all Approvers shown at the end of the approval cycle (when no Final Approval was specified). |
For the complete list of status icons, see “Page Status Icons”.
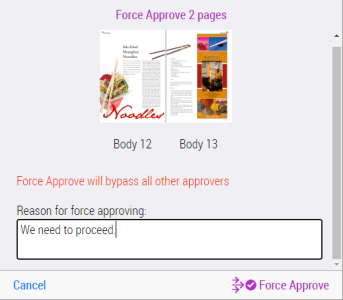
Force Approval
NOTE: Only for users with Administrator and CSR roles.
Printer Administrators and CSRs can Force Approve (all) pages and do not need to be assigned to a job with an Approver role. This will give the Printer Administrators and CSRs additional rights on the production process.
 |
A reason must be specified for the Force Approval.
 |
You can see the forced approval states in the Approval Overview palette.
Reapproval of a Frozen Page
NOTE: Only for users with Administrator and CSR roles.
Apogee Prepress provides frozen page states by a Web Proof option Freeze results when approved/continued to prevent that a page needs to be reapproved when the page is reprocessed.
Printer Administrators and CSRs can overrule the frozen state by selecting Require page Re-Approval to send the page back to the Print Buyer for approval. A notification is sent to the Approvers to reapprove these pages.
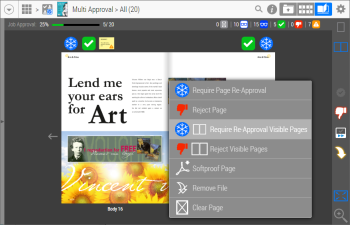 |
The frozen page states are shown in the Jobs Window, Flip Book, and Pages Overview.
These reapproval events are recorded in the Job Log.
Open and inspect a job
Click the link in the e-mail that you received notifying you that a job is ready to inspect. The WebApproval application opens in your browser and displays the job to be inspected in the Flipbook.
OR
In the Jobs window, you can see if a job has pages to inspect by opening the information panel of a job. Click the job tile to open it.
TIP: In the information panel, click a page status icon to filter the pages. For example, click the Preflight icon to display only the pages with preflight errors and warnings.
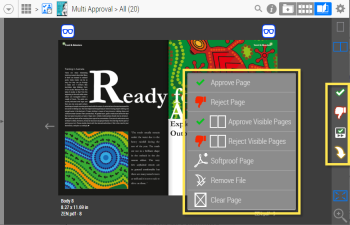 |
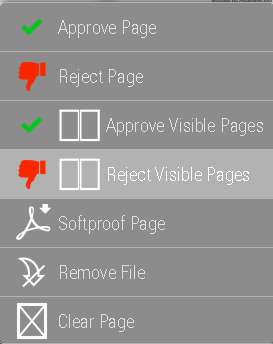
The Actions panel on the right is active and you can right-click a page to display the Approve/Reject commands in the Actions menu. These options are available in the Flipbook as well as Pages Overview. Switch to Pages Overview for an overview of the publication and if you want to select more than two pages for approval/rejection.
You can see how the job is progressing by switching on the Job Progress bar (press A).
 |
Approve pages
NOTE: Only for users with the Approver role for the job.
1 In the Flipbook, go to the page or spread that you want to approve.
If the job is for a multi-part product, you can select a part in the Parts drop-down list in the top navigation panel.
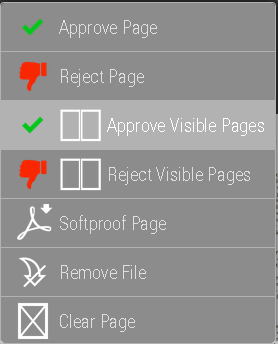
2 Click the Approve button in the Actions panel on the right.
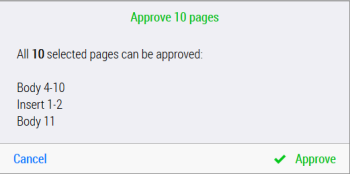
A confirmation window is displayed.
 |
3 If you are in spread view, select or clear the boxes for the right and the left page as required and click Approve.
If you want to approve more than two pages, switch to Pages Overview where you can select multiple pages. The confirmation window lists the pages that will be approved:
 |
4 To approve pages without confirmation windows, right-click the page to display the Actions menu and choose Approve. If you are in spread mode you can also choose to approve the spread (visible pages).
 |
CAUTION: These actions take effect immediately without a confirmation window being displayed.
5 To fast-track the approval process, click the Quick Approval button in the Actions panel on the right (Flipbook only).
This will approve the current page or spread and take you to the next page or spread which is ready to inspect.
The Quick Approval button is blue if you are on a page that cannot be approved.
 |
CAUTION: Quick Approval takes effect immediately without a confirmation window being displayed.
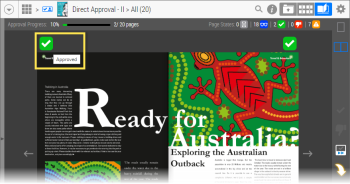
The green Approve icon is displayed in the top corner of the page and the page thumbnail now has a green border.
Approve all pages
All pages with the Ready to Inspect status are approved. If you selected a part with the Parts drop-down list, only the remaining pages of the current part are approved. See “Place files in multi-part jobs” for information on multi-part jobs.
Reject a page
Rejecting a page always creates a rejection mark.
1 In the Flipbook, go to the page or spread that you want to reject and click the Reject button.
2 Alternatively, right-click the page to display the Actions menu and choose Reject. If you are in spread mode you can also choose to reject the spread (visible pages).
 |
A confirmation window is always displayed when rejecting a page.
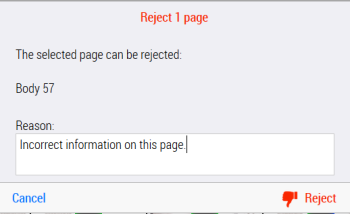 |
3 You must enter a reason for rejecting the page or spread. This creates a rejection mark on the page in question. If you are in spread mode, select or clear the boxes for the right and the left page as required.
4 Click Reject to submit the rejection and the remark.
A red diagonal line across the page indicates that the page has been rejected.
.
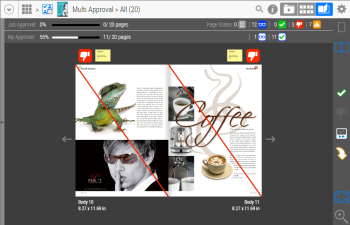 |
A red Reject page status icon is displayed in the top corner of the page, together with a Remark icon, and the page thumbnail has a red border.
Other WebApproval users can open and read the remark by clicking the icon. The remark is also sent to the printer.
Approve a rejected page
1 Go to the rejected page or spread that you want to approve and click the Approve button.
2 You must enter a reason for approving the rejected page or spread.
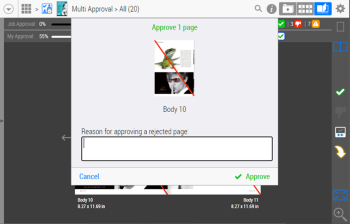 |
The rejection remark on the page is updated with your approval remark.
Reject an approved page
An approved page is ready for printing or may already be printed. Only the users of the Printer Company are able to cancel a page approval and reject a page which has already been approved by another user.
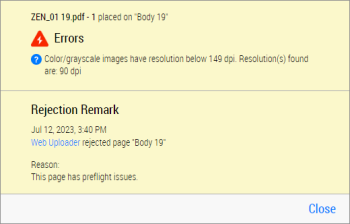
Review pages with preflight remarks
Placed files may have preflight issues which are flagged by the WebApproval system with a yellow preflight remark icon in the top corner of the filled pages in question. These remarks should be reviewed and the pages should be rejected and replaced if necessary.
NOTE: If you are a WebApproval Pro user, you should check preflight issues using the Flipbook palette. See “Reviewing preflight remarks in the Palette”.
1 Go to the page with a preflight remark in the Flipbook or Pages Overview (Product Flipbook and Products Overview for packaging jobs).
2 Click a preflight remark icon to open the preflight remark that lists the issues for that selected page. Click the blue Help icon for more detailed information about the preflight issue.
 |
See “Review uploaded files with preflight report” for more information on preflight issues.
NOTE: It is recommended to discuss preflight issues with the Printer Company to avoid unexpected results in the printed product.
If you reject the page, your rejection remark is added to the preflight remark.
 |
doc. version 13.1.1