Imposition Reports
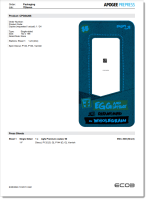
Imposition Reports can be created from the Job List or from any of the Apogee Impose windows. An Imposition Report includes a mock-up of a Press Sheet imposition and the details of the job. This information is exported as a PDF file and saved to a specified location. The report can be created interactively if needed for the job at hand or you can set it up to be generated automatically each time a job is processed. The mock-up includes the main rule-ups, fixed measurements (not custom measurements), lays, colorbars and gripper. The job details may include a variety of the parameters you can find in Product inspector such as paper stock, press sheet size, folding scheme, etc. A report is created for each flow in the plan. The presets for these reports are created in the Imposition Reports editor.
Generate an Imposition Report interactively
This procedure is for generating an Imposition Report interactively for a selected job which has been imposed.
1 In Product View or Press Sheet View, choose Imposition > Export Imposition Report.
OR
In the Job List, context-click the job and choose Export Imposition Report.
2 In the dialog box, choose an Imposition Report preset from the drop-down list. Two presets are provided by default: one for a mock-up and one for a mock-up and job details.
3 Click the Export and Open button.
A report is created for all the press sheets and according to the Imposition Report preset you chose, for example with or without page previews. The PDF opens in your PDF reader application. The PDF is saved in the location specified in your preset.
You can create a bespoke Imposition Report for your job by clicking Manage Imposition Reports at the bottom of the drop-down list.
Generate Imposition Reports automatically
You can set up your Job Ticket or Hot Ticket so that an Imposition Report is created automatically each time the job is processed. This is done in the Impose component of the Production Plan where Apogee Impose must be selected for the imposition.
1 Go to the Impose component in the Production Plan of your Job Ticket or Hot Ticket. If you have multiple flows, repeat this procedure for each flow.
2 Unlock the settings and choose an Imposition Report preset from the drop-down list.
3 Select the Export automatically check-box and lock the settings.
4 Make sure your imposition is ready and set the View options in Press Sheet view. If necessary, create a View options preset that can be referenced in the Imposition Report preset. Any changes you make to the View options are not shown in the mock-up if they are not saved as a View options preset.
5 Submit the Job Ticket.
An Imposition Report will be generated and saved in the location specified in the preset when you process the job. The PDF does not open automatically and you need to browse to the output location to open it.
Create an Imposition Report preset
Imposition Report presets are created in the Imposition Report editor.
1 In Product View or Press Sheet View, choose Imposition > Export Imposition Report.
OR
In the Job List, context-click the job and choose Export Imposition Report.
OR
Go to the settings panel of the Impose component in the Production Plan of your Job Ticket or Hot Ticket.
2 From the Imposition Reports drop-down list, choose Manage Imposition Reports to open the Imposition Reports editor.
3 Create a preset like you would for other resources.
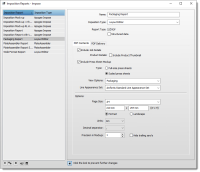
Imposition Reports Editor
This dialog box is for creating presets that need to be selected if you want to generate an Imposition Report. You can specify if you want a section with the details of the job, a section with a mock-up, or both sections.
 |
Contents
Include Job Details
Select to include information about the job:
•General information: Order no., Job name, Customer name and contact, comments
•Products and Parts: A table lists the product (or multiple products) and its parts with the settings as used for the job (Fold Sheet, Pages, Scheme, Size, Stock, Press), product thumbnail
•Press Sheets: A table lists the press sheets of the job with their settings (workstyle, colors, size, stock, press, run length)
 |
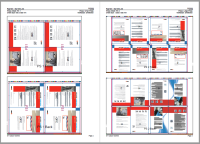
Include Press Sheet Mock-up
Select to include previews of the Press Sheets which by default will be full-size and use the Standard View Options; you can control this with the following options:
Type
Full-size press sheets: the Front and Back sides of all the Press Sheets are produced at full-size and per page of the PDF
Scaled press sheets: The Front and Back sides of each Press Sheet are scaled so they can be shown on a single page of the PDF
View Options
Select one of the presets for the View Options from the drop-down list; this determines which components will be shown in the mock-up; for example the page previews (page content), rule-ups, measurements, etc. Note that any incidental changes to View Options that you may have made in Press Sheet view will not be shown in the mock-up. It is recommended to set up the View Options you want for your report in Press Sheet view and then save these View Options as a preset that can be picked up here.
Line Appearance Set
When the Imposition type is Layout Editor, you can select a line appearance set to be used to draw the Operations. If there are no line appearance sets, the pop-up is blank and the report will not have any Operations drawn. The last drop-down menu option opens the Line Appearance Sets - Impose dialog box to manage the Imposition Report Resources.
Line Appearance Set option is hidden when the Imposition type is not Layout Editor.
 |
Page number
Select to use the Run List indexes instead of the page labels.
JDF sheet names
Select to use the JDF names for the Press Sheets, if applicable.
Page size
Select the page size of the Imposition Report PDF for the job details section and the mock-up if the scaled press sheets option is chosen.
Units
Choose mm or inches for the units used in the report.
Decimal separator
Choose decimal point or comma for the units used in the report.
Precision in Mockup
Choose the number of decimals to be used for printing dimensions and distances in the mock-up.
Hide trailing zero’s
Choose this check box to hide trailing zero’s in the decimal part when printing dimensions and distances in the mock-up.
Result Delivery
On this tab you can specify the Export Directory and the File Name for the report using the usual variables or by browsing to a location. In the Conflict Handling section you can choose to replace existing files (reports) or keep existing files and add a sequence number (_1, _2, etc.) to the file name each time a report is generated.
doc. version 13.1.1