Folding Scheme Editor
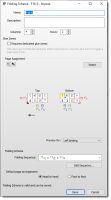 |
General
Name and Description
Enter a meaningful name and description
Columns and Rows
Columns indicate the number of horizontal cells and Rows the vertical cells of the page arrangement.
Glue Zones
Select the check box if you want to apply ink-free areas for gluing; when selected, the glue zones are displayed as blue strips in the folding scheme diagram, and the glue tool is enabled.
 |
Page Arrangement
If you have an existing Fold Sheet that you want to emulate, the Page Arrangement method is used to create a scheme. You simply assign page numbers in the cells using the two buttons and select a binding edge to preview the page orientation of the Fold Sheet.
NOTE: The page numbers of a Folding Scheme are not necessarily the page numbers of a Product. The first page is always 1 and the last page is always the number of pages on the Fold Sheet. You only see the page numbers of the Product when you apply the Folding Scheme to the Fold Sheets.
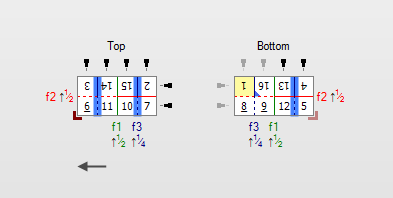
Folding Scheme diagram
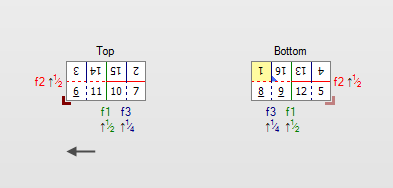 |
1 Red corner icon: Lay on Front 2 Red corner icon (faded): Lay on Back 3 Yellow page: The lowest page number of the signature 4 Blue corner icon: Top page of the signature 5 Page numbers: rotated according to the rotation of the page on the Fold Sheet; ambiguous numbers are underlined 6 Fold lines which are colored (green, blue, red) - solid line: if the pages are still on top - dashed line: if the pages are underneath 7 Fold line labels in the same color as the lines and as an extension of the line; f1, f2, f3, etc. indicate the sequence of the folds 8 Jog edges in solid black and non-jog edges in gray |
Arrangement buttons
 | cursor button for typing the page numbers on the Front or Back of the Folding Scheme; the number for the other side (Front or Back) is added automatically | |
 | pointer button that inserts page numbers on the Front and Back of the Folding Scheme | |
Reset | resets the scheme and empties the cells | |
 | glue tool |
Preview for
Left, Right, Top or Bottom binding for the Press Sheet preview.
NOTE: This binding style is not part of the actual Folding Scheme setting.
Folding Scheme
If you don’t have an existing Fold Sheet to work from, you can enter the sequence here using the Folding Sequence Notation.
Folding Sequence
Indicates the sequence for the scheme
Edit Sequence
This button opens the Folding Sequence editor where you can edit an existing folding sequence or create a new one
Default page arrangement
•Head to head: arranges pages in such a way that the head of the pages is on the closed head of the signature, suitable for jogging to the head
•Foot to foot: arranges pages in such a way that the foot of the pages is on the closed head of the signature, suitable for jogging to the foot
To edit, add or duplicate a Folding Scheme
You can add a new Folding Scheme to an existing Set or create a new Set first and add your new Folding Scheme to this new Set. Every scheme you add becomes a part of every Set but is only enabled in the Set where it was originally added.
1 In the Folding Schemes dialog box, click the New button or the Edit button to open the Folding Scheme editor directly, or click the Duplicate button and then edit the newly created scheme in the list.
2 Enter a name and description.
3 Enter the number of columns and rows.
NOTE: If you made a copy of an existing scheme, the page arrangement is reset and the cells are emptied if you change the number of columns or rows.
You now have two options to make the actual scheme.
4 Use the Page Arrangement buttons to create the scheme. Clicking the Reset button displays a blank scheme.
 |
Enter the binding for previewing the Folding Sheet. This may also change the layout of the pages to meet Head to Foot and Foot to Foot restrictions.
OR
5 Click Edit Sequence to open the Folding Sequence Editor and create the sequence using the Folding Sequence buttons.
6 Click OK.
 |
7 Choose the Default page arrangement.
8 Click Save.
If a Folding Scheme with the same folding sequence and the same page arrangement already exists or a Folding Scheme with the same name exists, Apogee Impose displays a warning dialog box.
9 Click Save Anyway or Cancel.
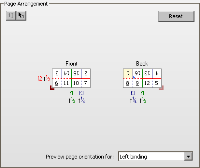
To work with the Page Arrangement tools
1 Enter the Name, Description, and Columns and Rows for the Folding Scheme.
The Page Arrangement grid displays empty cells.
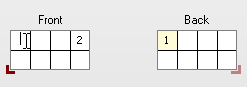
2 Click the cursor button and click the cell where you want the first page to be located.
|
3 Type “1”.
Apogee puts the corresponding back page in the correct cell of the Back of the Folding Scheme.
 |
NOTE: The Back Page number is displayed when you click in a following cell.
OR
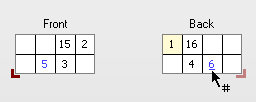
4 Click the pointer button and hover over the cells of the grid.
|
Apogee displays the first or next page number on the Front and Back of the Folding Scheme.
 |
5 Continue until all pages have been arranged.
Apogee Impose now displays the completed Folding Scheme:
•the folding lines and Folding Sequence
•the page with the lowest page number
NOTE: If the arrangement of the pages cannot be folded, a message is displayed and you need to change the sequence.
To use the Folding Sequence editor
1 In the Folding Scheme editor, click the Edit Sequence button to open the Folding Sequence editor.
The Folding Sequence editor is empty if you are creating a new Folding Scheme and you did not create a scheme with the Page Arrangement tools. If you copied an existing scheme, the sequence for that scheme is displayed but is cleared once you start editing.
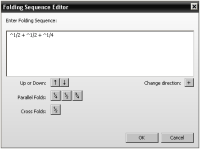 |
2 Click in the Folding Sequence box and use the following shorthand notation to define the sequence.
 | Fold up; use button or type “ ^ ” | |
 | Fold Down; use button or type “ v ” | |
1/4 | Parallel Fold: parallel to the first fold and 1/4 of total length; use button or type the fraction | |
1/2 | Parallel Fold: parallel to the first fold and 1/2 of total length; use button or type the fraction | |
3/4 | Parallel Fold: parallel to the first fold and 3/4 of total length; use button or type the fraction | |
1/2 | Cross Fold: perpendicular to the first fold; use button or type the fraction | |
+ | Change direction; use button or type “ + ” |
NOTE: The folding direction depends on the position of the lay.
3 Enter the folds until the Folding Sequence is complete and the message ‘Folding sequence is not complete yet’ is no longer displayed at the bottom of the dialog box.
4 Click OK.
NOTE: The OK button is only enabled when the sequence is complete.
To export a Folding Scheme/Folding Scheme Set
You can export a Folding Scheme/Set to another Apogee system.
1 In the Folding Scheme Overview (right column) or the Folding Scheme Set overview (left column), click the export button.
 |
2 Browse to the folder where you want to save the Folding Scheme/Set and click Save.
To import a Folding Scheme/Folding Scheme Set
You can import a Folding Scheme/Set from another Apogee system.
1 In the Folding Scheme Overview (right column) or the Folding Scheme Set overview (left column), click the import button.
 |
2 Locate the folder from which you want to import the Folding Scheme/Set, and click Open.
NOTE: You may need to confirm that existing Folding Schemes can be overwritten.
doc. version 13.1.1