Punch Calibration Editor
In this window, you can specify the punch settings for the imagesetters or platesetters and print a test page in order to measure the offsets.
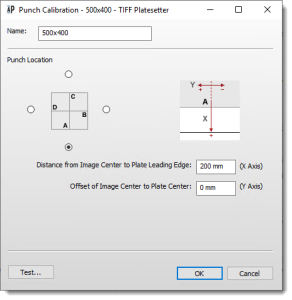 |
Name
The name of the punch calibration. This field cannot be left empty.
Punch Location
The location of the Punch (virtual or real) on the test image. This can be the device punch or the transfer punch.
X Axis
The distance between the center of the test image and the punch reference (punch center for film and leading edge for plate).
Y Axis
The offset between the center of the test image and the punch center for films. This option is disabled for platesetters.
Plate Exposure Unit Pin Bar (Imagesetters only)
Specify the distance between the film punch and the edge of the plate when both the film and the plate are mounted on the pin bar. This option is disabled for platesetters. The initial value is the last entered value.
Test Page
You can print a test page in order to measure the offsets. Proceed as follows:
1 In the Punch Calibration dialog box, click the Test button.
The Punch Calibration Test Page dialog box is displayed.
2 Select the Output Size that you want to associate with the Punch Calibration.
3 Click the On list and select the media you want to print the test page on.
4 Select any Parameter Sets you may have created for the Image and Output operations.
5 Click Print.
A test job is composed and automatically submitted to the device, and a progress indicator appears. You are notified when the job has been successfully submitted.
NOTE: The OK button is disabled if you have not selected a valid tray.
To create and edit an output size
1 In the System Overview, select the Output Task Processor for which you want to create or edit an Output Size.
2 Double-click the Output Sizes icon in the Resources pane.
 |
The Output Sizes overview appears.
3 Do one of the following to create or edit an Output Size.
•Click the New button to create a new Output Size.
 |
•Select the Output Size that you want to edit in the Output Size list in the upper pane and click the Edit button.
 |
The Output Size editor appears.
4 Type the name for the Output Size and specify the width, height and orientation.
5 Select a punch calibration from the Punch Calibration list.
NOTE: You can select None if you do not want to use a Punch Calibration. In that case, no offsets are applied.
6 Click OK.
Your settings are saved. The newly created Output Size appears in the list.
7 Close the Output Sizes dialog box.
To create and edit a new punch calibration
1 In the System Overview, select the Output Task Processor for which you want to create or edit a punch calibration.
2 Double-click the Output Sizes icon in the Resources pane.
|
The Output Sizes overview appears.
3 In the lower pane, do one of the following to create or edit a Punch Calibration.
•Click the New button to create a new Punch Calibration.
|
•Click the Edit button to edit a Punch Calibration.
|
The Punch Calibration editor appears.
4 Specify the Punch Calibration settings. See “Punch Calibration Editor”.
5 Click OK to save your settings.
The settings are saved. The newly created Punch Calibration appears in the lower pane. You can select the required Punch Calibration in the Output size dialog box when creating or editing an Output Size. See “To create and edit an output size”.
6 Close the Output Sizes dialog box.
To delete a punch calibration
1 In the System Overview, select the Output Task Processor for which you want to delete a punch calibration.
2 Double-click the Output Sizes icon in the Resources pane.
|
The Output Sizes dialog box appears.
3 In the lower pane, select the Punch Calibration that you want to delete and do one of the following:
•Press Delete.
•Click the Delete button.
 |
4 Click Yes to confirm the deletion.
5 Click either Yes or No depending on whether you want to delete the linked Output Size.
The Punch Calibration is deleted and no longer appears in the lower pane.
6 Close the Output Sizes dialog box.
doc. version 13.1.1