PDF Render - Trap Settings
 |
You can access these settings:
•When creating Parameter Sets (see “Managing Parameter Sets”). Here, you will see a ‘Lock in Production Plan’ check box (selected by default). If this check box is selected, the settings will be initially locked in the Settings pane. If this check box is deselected, the settings can be edited in the Settings pane.
•In the Settings pane, in the Plan tab of the Job Manager and the Ticket Editor. The settings may be initially locked, as indicated by the Lock icon. If you edit the job, you can unlock them as described in “Settings Pane (Ticket Editor)”.
Name
The name of the Parameter Set as it will appear in the Production Plan. When you create a Parameter Set, you should specify a Parameter Set name. You can always change this name later by editing the job, choosing the Parameter Set from the Task Processor in the Plan tab, and unlocking the settings in the Settings pane.
Honor application trap zone and ink settings
Disables full-page Trapping. When selected, this option overrides the Global Trap options, described below. Apogee will then implement any Trapping and Ink settings which have been made in the original application (if the application allows it). If there are no application Trapping settings, then the job will be processed without trapping.
Apply application trap zones
The Trapping settings of the original application will be applied. You can still specify the Ink settings in the Apogee Trapping settings.
You can still select Apply Additional Global Trap Zone, if there are no global trap zones defined in the PS or PDF file.
NOTE: Application Trap Zones will always overrule the Apogee Trapping settings if both options are selected.
Apply additional global trap zones
Enables full-page Trapping. The Trapping settings of the original application will be ignored. The Global Trap settings will be used instead.
Trap Width
Normal:
Determines the width to be applied to the trapping elements. For quality offset printing, this value should normally be equivalent to a width of 0.5 - to - 2 lines. For a 150 lpi job, this would be a value between 0.24 pts and 0.96 pts (0.084 mm and 0.336 mm). The higher the quality of the printed output, the smaller the trap should be.
Black:
Determines the width to be applied to black trapping elements.
Trap Appearance
Trap style
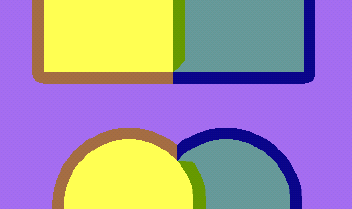
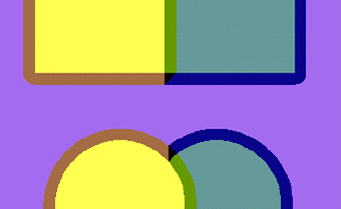
The Trap Style option specifies how the traps are created in a point where three or more images with trapped colors, intersect each other. You have the following options:
•Split: This option will avoid the dark areas. This style is recommended for offset printing.
 |
•Overlap: This option will leave the object shapes more intact. This style is recommended for packaging.
 |
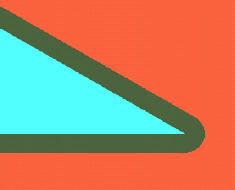
Trap corner shape
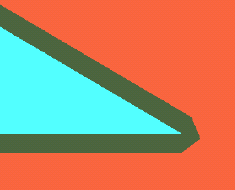
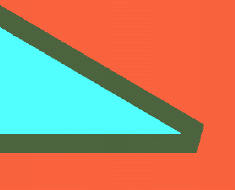
The Trap Corner Shape setting provides three options for the outside spread style of the trap corner:
•Triangle
 |
•Square
 |
•Round
 |
Trap Images
Image boundaries
This value specifies the position, relative to the image border, where a trap will be placed:
•Center: Places the trap half on the image and half on the object when both have to be trapped to each other. This option applies to image-to-object trapping and image-to-image trapping. Image-to-image trapping, however, only supports the boundaries “Center” and “Normal”.
•Normal: Applies the general trapping rules, and places the trap in accordance with the neutral densities of the image pixels. This option should be rarely used, since the color information in the image might be different for each single pixel, which may produce a “jagged” result.
•Spread: Places the trap on the vector information only. This option is useful for images that are placed on a dark background, such as a black keyline. If text is placed on the image, then this option helps to preserve the integrity of the text.
•Choke: Places the trap on the image only. This option is useful for images that are placed on a light background.
1-bit images
This option should be checked when you want to trap 1-bit TIFFs (with transparent background). The trap will be created between the image and the background, according to the standard trap rules. When an Image mask abuts an image, a trap will be created according to the Inks setting.
You can clear this option if you want to improve trapping performance. In particular, you should not use this option when working with copy-dot files or very complex image masks.
Within images
This option enables the creation of traps within images. In most cases, you should avoid trapping within images. It may be only really necessary when dealing with screen dumps or very high contrast artwork which is created without anti-aliasing in an image processing system. However, if you use this option, it should only be applied to the specific area (defined by trap zones) which contains the image, and not to the document as a whole.
NOTE: For standard operations, you are advised not to use this option.
Image to image
This trapping option is useful when one of the abutting images has a dominant color that is mostly absent from the other image, or simply when you want to produce traps consistently along all image edges.
The Image to Image traps are placed to the Center. If Spread or Choke is selected or if Image Boundaries are off, Center will be applied.
Only if Trap Image Boundaries is set to Normal, will the Image to Image traps also be set to Normal.
Thresholds
Sliding traps color limit
Slides a trap gently from the lighter area to the darker area whenever the difference in “darkness” between the two areas is less than a specified percentage (0-100%). When the Sliding Trap Color Limit is set to 100%, no sliding to center will occur, and the general trapping rules will be applied.
Relative color step limit
Traps are used in areas of varied color whenever the relative percentage of difference between two adjoining colors exceeds a predefined limit. The Relative color step limit option allows you to specify this percentage of difference. The lower the value, the more traps will be created. The default relative color step limit is 200%.
Trap color density reduction
Allows you to reduce the darkness of a trap. This value is specified as a percentage (0-100%). This produces a trap that is “lighter” than would normally be used. The higher the color density reduction you specify, the lighter the trap. At 100%, the trap will have the same neutral density as the darkest color.
For more in-depth information, see “Understanding Trap Settings”.
Black Trapping
Allows you to define which color has to be handled as black. There are two editable parameters:
Color tint value at least
Trapping can be configured to handle other dark or almost-black colors in the same way that it handles 100% black colors.
Color density at least
Any ink at or higher than the specified color density threshold value will be treated as black.
For more in-depth information, see “Understanding Trap Settings”.
doc. version 13.1.1