Understanding Trap Settings
This section provides more detailed information on the following options introduced in PDF Render - Trap Settings.
•Using a Sliding Traps Color Limit
•Using a Relative Color Step Limit
•Using Trap Color Density Reduction
•How Black Trapping Works
Using a Sliding Traps Color Limit
As a general rule in trapping, a trap in the “lighter” color should always spread into the “darker” color. However, if the color in one of the lighter area changes gradually (e.g., a blend or a vignette), then the trap will “jump” into the darker area, creating a visible jagged edge as illustrated below left.
 |
Jagged Trap (100%) and Slanting Trap (70%)
You can fix this type of problem by specifying a Sliding Traps Color Limit. This allows a trap to slide gently from the lighter area to the darker area whenever the difference in “darkness” between the two areas is less than a specified percentage (0-100%).
In the example (above right), if you set the Sliding Trap Color Limit to 70%, the trap line will start to gradually slide into the darker area whenever the difference is less than 70%. This gives a gradual and barely perceptible slant of the trap line into the darker area, and avoids the abrupt and jagged jump.
Using a Relative Color Step Limit
Suppose you had 2 adjoining colors - Color A and Color B - with the following CMYK attributes:
CMYK | COLOR A | COLOR B | ABS DIFF | REL DIFF |
|---|---|---|---|---|
Cyan | 35% | 5% | 30% | 30/5 = 600% |
Magenta | 5% | 40% | 35% | 35/5 = 700% |
Yellow | 16% | 20% | 4% | 4/16 = 25% |
Black | 8% | 5% | 3% | 3/5 = 60% |
The relative difference is equal to the absolute difference divided by the smallest component of the two colors.
If you specify a Relative Color Step Limit of 10%, then a trap will be needed between these 2 colors. This is because there is a relative difference of more than 10% in at least 2 of the component colors (Cyan and Magenta) and this in opposite directions.
NOTE: You need also an absolute difference of at least 5%.
Using Trap Color Density Reduction
When a trap is created between 2 colors, the trap will adopt the highest color value for each of the CMYK elements available in the 2 adjoining colors. The resulting color is always darker than the two original colors, which produces a dark gray to black trap. However, you can reduce the darkness of the trap by setting a Trap Color Density Reduction value.
 |
Normal Trap Density (left) and 100% Trap Color Density Reduction (right)
How Black Trapping Works
There are three Black Trapping rules that are applied whenever black is involved:
•The Black Trapping sets a percentage of deviation from the normal trap whenever black is involved in the creation of a trap. This is because registration problems are more visible whenever black (or a very dark color) is involved. Traditionally, therefore, the width of a trap to a black area is made wider than a standard trap. A good default setting to use here is 200%.
•Auto-choke is always active. In cases involving a rich black (solid black with one or more support colors) that shares a common edge with white, a reverse trap will be created.
•Always spread under black.
However, when is black really black? To define which color has to be handled as black, you must specify minimum values for Color Tint and Color Density. Both of these values are required for a color to be considered as black.
Color Tint
Setting a minimum color tint value is useful in specific situations. For example, if you are printing on newspaper quality or with polyester or other so-called lower quality plates, you may not use the full range of color tints (0-100%). Instead, you may limit color tints digitally between 4-96%. In this case, there will be no 100% black in the digital document. However, if you set the Color Tint Value to 96%, the Trapping module will treat black at 96% as it would treat black at 100%.
Color Density
Setting a minimum color density is useful when you have dark spot colors that you want to be handled the same as black.
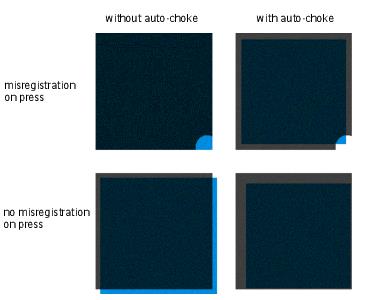 |
How Black Trapping Works
Basic Trapping Terms
Spread
A spread traps a light colored foreground object to a dark background. The darker of two adjacent colors defines the visible edge of the object. Therefore, spreading the lighter color slightly into the darker color maintains the visual edge.
Choke
A choke traps a light colored background to a dark foreground object.
doc. version 13.1.1