WebGrowth Profiles Overview
When you open this resource you will see a list of the available WebGrowth Profiles. The table shows the Press, Ink Set, Paper Stock and Weight for which the profile has been created.
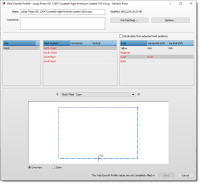
WebGrowth Profiles Editor
You can edit any of the listed profiles or create new ones from scratch in the editor.
 |
Name
The initial name filled in here is taken from the initial Print settings but you can change it to suit your needs
Print Settings button
Click this button to open the initial Print settings dialog if you want to modify the settings; Press Name, Ink set, Stock, Weight, and Grain/Flute).
Options button
Here you choose whether you want to set up compensation for the different inks and how to measure the shift.
Inks
•Measurements: One compensation per color or One compensation for all colors. For the latter, you can also specify if spot colors will be used and then you can enter values for these colors too.
•Spot colors: Number of spot colors.
Measurements
•Back side compensation: choose whether you want to enter dedicated values for the back of the press sheet (Custom back) or Same as Front or Mirrored to Front.
•Measurement type: If you chose One compensation per color you can specify here to which color (yellow or black) the measurement relate; Relative to theoretical position should be chosen if you can measure the distance to all colors exactly in relation to the reference zero point with a digital meter.
Settings Table per Web
The second panel in this dialog box is a table that gives the mark position and the measured growth values per web and per web side.
Side
Select the side in the left column.
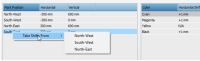
Mark Position
Specify the position of the WebGrowth mark in the center column. The four corners of the sheet are indicated with North-West, South-West, North-East, South-East and the Horizontal and Vertical values specify the exact distance from the center. The values are red until all values have been entered per mark. You can see the selected mark in the overview panel at the bottom of the editor.
Shift
The column on the right is where you enter the web growth values that you measured on a printed test using a WebGrowth mark. The horizontal and vertical shift must be entered for all inks or for each ink separately – process inks and spot colors (S1, S2, etc.). These values can be positive (shrinking) or negative (expanding). The values are red until all values have been entered per mark. Context-click a Mark Position to take shifts from other positions.
 |
Overview/Zoom panel
In this panel you can see where the WebGrowth marks are positioned on the sheet as you select them in the Mark Position panel. The sheet is indicated with a dashed blue line. The mark and deformation are shown in the ink color or in black if the same compensation applies for all inks. The drop-down list provides quick access to all the marks per web and per color. Use the arrows on the left (up) and right (down) to move up and down the marks in the Mark Position table and per color. Select the Zoom button and use the slider if you need to zoom into an area to see the mark.
Create and Test a WebGrowth Profile
1 Click the New button in the WebGrowth Profiles overview:
 |
A new untitled Resource dialog box is displayed.
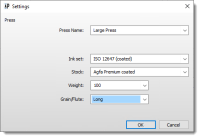 |
2 Enter the initial Print settings for the profile:
•Press Name: choose a web-fed press from the list of your presses
•Ink set, stock, weight
•Grain/Flute: always set to Long for web presses
3 Click OK to confirm these initial settings and then you can continue in the WebGrowth Profiles Overview.
4 Click Save when all the measurement values have been entered.
5 The profile is displayed in the WebGrowth Profiles resource.
6 Select this new profile in the list and click Test in the bottom right corner to generate a test page and verify that the web growth is OK.
doc. version 13.1.1