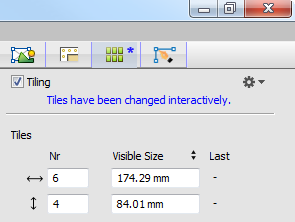
Interactive Tiling
Automatic tiling uses the settings in the Tiling inspector to create a grid where most of the tiles have the same size. However, you can use interactive tools to create a non-grid tiling arrangement from scratch or to modify the rows or columns of an existing arrangement.
Interactive tiling is indicated with a blue asterisk in the Tiling inspector header:
 |
The following tools are available for interactive tiling:
Split Tool (Manual Tiling)
You can use the Split tool to create tiles from a master image in free-style manner. The Split tool is visible in the tiling toolbar in the bottom left corner when you are in the Tiling inspector tab.
1 Open the image you want to tile in the Product Editor and go to the Tiling inspector tab.
2 Click the Split tool in the toolbar, or press K, to activate the tool. Now you start to tile an untiled image from scratch or to fine-tune an existing tiling arrangement.
 |
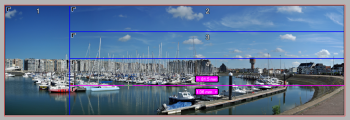
3 Hover over the image to start tiling.
If you are tiling an untiled image, the Tiling check box at the top of the Tiling inspector tab is activated from the moment you create your first tile. If you want overlaps, gaps or extensions, you need to specify them before you start splitting.
NOTE: Changing the basic tiling settings in the inspector will undo interactive edits. Changing overlap size preserves interactive edits.
The Split cursor (large cross) appears with a magenta line parallel to the shortest side of the image, and the width of the split tiles on either side of the split line.
4 Move the split line to the desired position and click to confirm the splitting.
 |
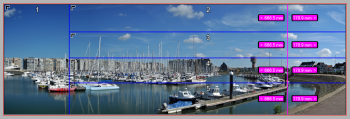
You can change the splitting orientation (from parallel with the shortest side to parallel with the longest tile) by pressing and releasing the space bar or TAB key.
 |
The orientation of the split line changes automatically if you move into a tile whose shortest side or longest side has a different orientation.
You can extend the splitting in one tile across all the tiles of an image by holding down the SHIFT key.
 |
Split Tool Shortcuts
Activate the Split tool by pressing K with the Tiling inspector selected. To control the splitting of tiles selected with the Split tool, use the following shortcuts.
To | Press |
|---|---|
Change the splitting orientation (the magenta splitting line) | Space bar or TAB key once |
Extend the splitting action across all tiles | Hold SHIFT |
Repeat the split. | CTRL |
Cancel the image splitting | ESC |
Selection Tool
If you created tiles interactively with the Split tool or automatically with the inspector, you can fine-tune them further with the selection tool. In this mode you can select tiles and change their size, merge the tiles, etc.
NOTE: You cannot create new split lines in this mode.
1 Select the Selection tool in the bottom toolbar.
 |
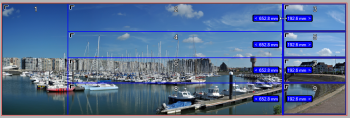
2 Hover over the split lines to display the tile dimensions on either side of the line, and the resize arrow.
3 Click and drag a split line to edit the tile size.
 |
Use standard shortcuts to select multiple tiles. Hold SHIFT to resize all the selected tiles.
Omit Tiles
You may decide that a particular tile in your tiling scheme does not have to be printed.
 |
The tile in question is grayed out which means it will not be created. The tile numbering and the total number of tiles is modified accordingly. When you apply the changes, this tile is not added to the Product panel in the Layout Editor.
NOTE: You can revert the delete tile action by selecting the Print check box again, even after you applied the changes.
Merge Tiles
Adjacent tiles can be merged along their common split line to create a new, merged tile. Settings for overlaps, gaps and extensions are applied to the newly created tile.
You can use the Merge Tiles command in the Positioning toolbar to merge selected tiles or drag the split line of a tile to append adjacent tiles.
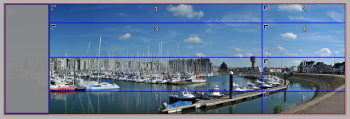
1 Select two or more tiles you want to merge with the Selection tool.
2 When the selected tiles form a rectangle, the system activates the Merge Tiles button in the Positioning toolbar.
 |
3 Click the Merge Tiles button to merge the selected tiles.
OR
1 In Selection tool mode, hover over the common split line between the tiles you want to merge and drag the line to the opposite edge of the tile you want to append.
The split line snaps to the edge of the first tile.
2 Release the mouse button and the merged tile is created
The tile numbering and the total number of tiles is modified accordingly.
3 Now you can drag the split line to the edge of the following tile if you want to merge multiple tiles.
When you apply the changes, the merged tiles appear as a single tile in the Product panel in the Layout Editor.
NOTE: You cannot revert to the original tiles once you have applied the changes.
Horizontal and Vertical Splitting
Manual tiling with the Split tool is not ideal if you want equal splits across one or more tiles, or if you want to control overlaps, gaps and extensions. In these cases it is recommended to use the Split Tile buttons in the Positioning toolbar.
1 Select the tile you want to split with the Selection tool. If you want to apply the same splitting to multiple tiles, select multiple tiles.
2 Click either the Horizontal or Vertical Split Tile button in the Positioning toolbar or press CTRL+U, or context-click and choose Split Tiles.
 |
The Split Tile dialog box is displayed.
 |
The Equal size panel is enabled by default with the cursor in the horizontal or vertical Number box. This depends on whether you clicked the Horizontal or Vertical Split Tile button. The Equal size panel is similar to the Tiles settings in the inspector (see “Tiles”) and you can enter the number of horizontal columns and/or vertical rows to create a grid of tiles which all have the same size. Alternatively, you can enter a size and all columns and/or rows will have this size, except the last.
You can choose the Arbitrary sizes option button if you want to specify multiple horizontal and/or vertical sizes for some or all the tiles. Enter a size in the first horizontal and/or vertical box. This will be the size for the tile starting from the anchor corner. Continue with values for up to 5 tiles. You can use and asterisk if you want the system to split the remaining distance into equal tiles. For example, 100,200,*,400,*, splits a total distance of 1000 into tiles of 100, 200,150,400,150.
You can select the Advanced option if you want to enter more sizes. You can use spaces or commas to separate the dimensions.
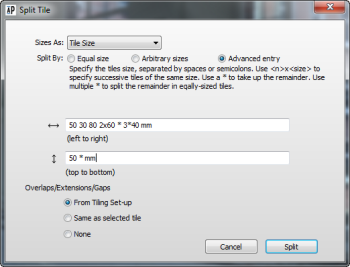 |
In the Overlaps/Extension/Gaps section you can choose how these settings are applied to the split tiles:
•From Tiling Set-up: the inspector settings are applied
•Same as selected tile: relevant if multiple tiles are selected for splitting; the new tile inherits the settings of the parent tile
•None: no overlaps or gaps are applied
3 Click Split to confirm your splitting settings.
Positioning Toolbar
The Positioning toolbar at the top of the Product Editor lets you inspect and edit each individual tile in the tiling scheme. Entering values in the boxes for Width, Height, Overlap, Gap and Extensions will override the values you see in the Tiling inspector and may also affect tiles which are arranged adjacent to the selected tiles. The measurement boxes you see in the toolbar depend on the tiling arrangement used to create the tiling scheme.
You also have tools for rotating and mirroring tiles when placed on the sheet, tools for splitting and merging tiles, and the Print check box that can be cleared if you want to omit a tile. The pencil icon opens the Assign to Set dialog that can be used to specify custom tile names for multiple sets of tiles.
Select one or more tiles to activate the tools.
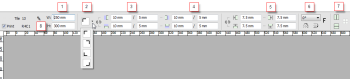 |
1 Width and height of the tile (value is “mixed” if multiple tiles are selected)
2 Anchor direction
3 Overlap size or Extension/No-ink zone on the Left, and Top edges of the tile
4 Overlap size or Extension/No-ink zone on the Right, and Bottom edges of the tile
5 Gap size on the Left, Right, Top and Bottom edges of the tile
6 Rotation and mirror tools
7 Horizontal and vertical Split tools and Merge tool
8 Assign to Set button
Positioning Toolbar Shortcuts
To control the Positioning toolbar when a tile is selected with Selection tool:
To | |
|---|---|
Open the Split Tile dialog box | CTRL + U |
Mirror the tile vertically when placed on a sheet | SHIFT + M |
Mirror the tile horizontally when placed on a sheet | M |
Rotate the tile clockwise in steps of 90° | SHIFT + R |
Rotate the tile anticlockwise in steps of 90° | R |
Merge the selected tiles | CTRL+ G |
Place the cursor in the first Overlap box of the Positioning toolbar | O |
Place the cursor in the first Gap box of the Positioning toolbar | G |
Jump to next box in the Positioning toolbar | TAB |
doc. version 6.1.1