Overview
The Product Editor is a module of the Layout Editor that opens when you open a product that has been added to the list of products in the Product panel.
Double-click a product or one of the tiles of a tiled image in the Product panel
OR
Context-click a product in the Product panel and choose Open in Product Editor
OR
When a product is selected in the Product panel, click the Edit product button in the Frame/Product inspector.
 |
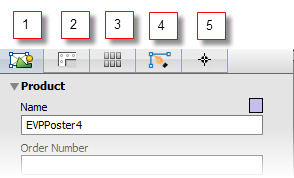
1 Positioning tools and snapping drop-down 2 Product pane 3 Inspectors 4 Editing toolbar 5 View Options palette |
Inspectors
The panel on the right consists of a number of tabs, which are referred to as inspectors, where the actual editing is performed.
 |
1 Product Inspector for basic edits to the product (size, bleed, etc.)
3 Tiling Inspector to tile a large image into smaller tiles
4 Paths Inspector where you can edit existing contour paths or create new ones
The following sections discuss each inspector separately and how the various settings affect the image being edited. Note, however, that changes you make in one inspector may also affect what you specified in another inspector and vice versa. For example, you can specify bleed in the Image inspector, create canvas extensions and grommets in the second inspector, and then tile the resulting product into smaller tiles in the Tiling inspector. The tiling is applied to the entire product including the extensions, while the bleed you specified in the Image inspector is applied to the individual tiles created in the Tiling inspector.
View Options Palette
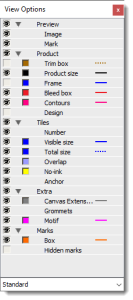
Open the View Options palette to choose the various boxes and non-printed information that you want to see while working in the Product Editor.
NOTE: Hiding content or marks with the View Options palette does not mean they will not be printed.
 |
 |
The following components can be shown/hidden:
•Preview
•Image: the actual content of the image you are editing
•Mark: the cutting marks selected for finishing, or other marks
•Product
•Trim box: the original trim box of the image
•Product Size: the box indicating the size of the product to be printed
•Frame: the box around the image that includes canvas extensions but not the bleed
•Bleed box: the box around the image that includes the bleed area, and the canvas extensions if applicable
•Contours: the path around an image for finishing operations, for example for cutting
•Design: an outline based on a CAD file for example.
•Extra
•Canvas Extensions: the box around the canvas extensions
•Grommets: the marks representing the grommets to be printed as content with the image
•Motif: the cells that contain the motif of a step & repeat pattern
•Tiles
•Number: the sequence number of the tiles
•Visible size: the box indicating the visible size of the tiles
•Total size: the box indicating the visible size plus overlapping edges and bleed
•Overlap: the overlapping edges of tiles as required for the tiling arrangement
•No-ink: the no-ink zone on the tile overlap
•Anchor: the black arrow icon indicating the anchor corner that depends on the montage sequence
•Extra
•Canvas Extensions: the outlines of flaps in case of canvas extensions
•Grommets: the grommets when applied
•Motif: the border of the motif (non-clipped) in a Step and Repeat pattern
•Marks
•Box: the bounding box of the marks
•Hidden marks: marks that will not be printed due to conflicts; displayed in a red, hatched box.
In the View Options drop-down list you can select, create, rename or delete preference sets for the View Options.
Toolbars
The toolbar in the bottom left corner basically has the same tools as in the Layout Editor, except for specific tools (Crop, Split, Paths) which are available in the Product Editor when the various inspectors are selected.
When using the Tiling inspector you will also see a positioning toolbar at the top of the product editing panel which is activated when you select a tile. See “Positioning Toolbar”.
Applying Changes
When you’ve finished editing a product you must click the Apply button in the bottom right corner to save your edits. So although you can see the changes you make as you work on the product, they are only final when you save them with the Apply button. You can click the Cancel button if you do not want to save your edits and keep the product as it was. Click the Apply to all button if you want to apply the edits to all the products in the job and overrule any previous edits made to these products.
NOTE: Saved edits are also applied to products already placed on sheets.
doc. version 6.1.1