Product Panel
The Product panel displays thumbnails of the products that you upload and want to place on the sheet for printing.
You can upload artwork files (images and documents) and CAD files to create products.
NOTE: Many of the features in the Product panel only apply for the Sheet Layout mode. Remember that you have a Sheet Panel that contains all your sheets when working in Print Layout mode.
Adding Products
Use the following methods to add products to the Product panel:
•Drag and drop one or more products onto the Product panel.
•Drag and drop one or more products onto a sheet.
•Drag and drop one or more products onto a printing device in the Jobs list.
•Click the + button in the top right corner of the Product panel and select one or more files from the location of your choice.
•Choose File > Add Products and select one or more products from the location of your choice.
If you add a product with the same file name, you are prompted to cancel, update or just add the new product:
•Update: Adds the file as a revision of the previous one. This replaces all placed products of the existing file with the new one.
•Just Add: Adds the file to the job as a new file with the same file name but with a copy suffix.
•Cancel: Cancels the action.
Thumbnails of the uploaded products are displayed in the Product panel.
Product Processing Status
While an uploaded product is being processed, you will see a product icon with a green background. When the processing is finished, you see a thumbnail with the file name and physical dimensions of the product.
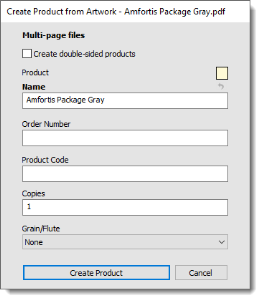
Adding Products from Artwork
When choosing artwork files to add products to the Product panel, you can change the default information and provide additional information.
 |
NOTE: This needs to be selected in your Preferences. See “General”.
Organizing Products
Click the cogwheel to display a menu for organizing and filtering the products you see in this panel.
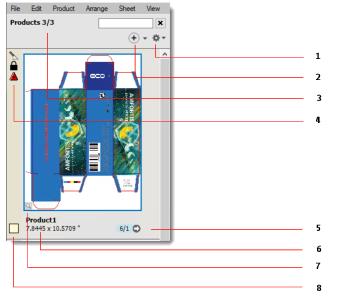 |
1 Cogwheel menu
2 Add Products button
3 Number of products displayed according to the chosen filter
4 Product status icons, errors and warnings
5 Instances of a product on all the sheets of a job
6 Product details: file name and physical dimensions
7 Product preview status
8 Product color
Tool Tip
A tool tip appears when hovering over the entire area of the product’s cell.
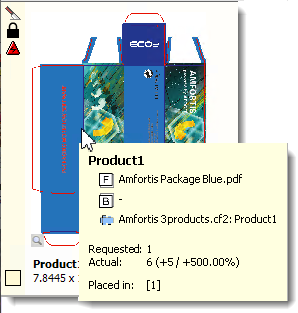 |
The tool tip shows the following information:
•Product name
•Artwork and design sources names with alignment values (snap-values)
•Requested and actual copy counts
•Content IDs, when the product is assigned to frames with content ID.
Add Products
The following commands are available on the Add Products button:
•Add Products: Creates products from a content file (e.g., PDF).
•Add Products From CAD: Creates products from a CAD file.
•Add Product(s) From Frame(s): Create product(s) from the selected frame(s).
•Duplicate Product(s): Duplicates the selected product(s).
•Place CAD layout: Creates a sheet from a CAD layout file or place a CAD layout on a sheet.
Cogwheel Menu
The following commands are available on the cogwheel menu:
•Show all: Shows all products in the job.
•Show placed: Shows only the products that are placed.
•Show placed on current sheet: Shows only the products that are placed on the current Sheet Layout.
•Show not placed: Shows only the products that are not yet placed.
•Has artwork: Shows products that have artwork assigned.
•Has no artwork: Shows products that do not have any artwork assigned.
•Single-sided: Shows products that are single-sided.
•Double-sided: Shows products that are double-sided.
•Sort by file name: Sorts the products alphabetically by their names, in ascending order.
•Sort by type: Sorts the products alphabetically by the file type of its artwork, in ascending order.
•Sort by Width: Sorts the products by their widths, in descending order.
•Sort by Height: Sorts the products by their heights, in descending order.
•Sort by Largest Dimension: Sorts the products by their largest size (i.e., the maximum of the width and height), in descending order.
•Show small thumbnails: Shows smaller thumbnails.
•Show large thumbnails: Shows larger thumbnails.
•Fit to largest: Shows thumbnails with a dynamic scale, where the widest thumbnail determines the scale.
•Fit each: Shows thumbnails with a dynamic scale per image, where each image is fit individually to the width of the panel.
•Show Product Colors: Colorizes the backgrounds of the cells using the product’s colors and draws a color picker to select the color.
•Show Both Sides: Shows a thumbnail that combines the front and back sides of the product side by side.
Managing/Editing Products
In the Product panel, context-click a product to display the following commands for this product:
•Get Info: displays the Info dialog box with information about the original product file organized in the General, Dimensions and Resources tabs; the Resources tab lists the fonts, products and spot colors used in the original product.
•Show Preflight Report: opens a PDF with a preflight report for the selected product, if available.
•Export Original File/Normalized PDF: exports the original file or normalized PDF to a location of your choice.
•Proof Product: opens the QuickProof dialog to proof the selected products. See “QuickProof Products and Sheets”.
•Delete Product: deletes the selected products from the Product panel, not from your disk.
•Duplicate Product(s): creates an exact copy of the products. See “Duplicating Products”.
•Assign Artwork: opens the file explorer to select artwork to add to an empty product.
•Front/Back: changes the front/back artwork of a product:
•From Available: selects a previously uploaded page from the sub-menu; list of all artwork that is available in the Page Store.
•Open: browses the file system and loads the artwork from a file.
•Blank: selects to have a blank side.
•Mirror: mirrors the current artwork, disabled when there is no current artwork.
•Swap with back: swaps the assignment with that of the other side (front/back).
•None: selects to have no artwork on that side.
•Get Info: shows the Get Info window for the assigned artwork.
•Show Preflight Report: creates and opens the Preflight Report for the document that is assigned to the current side.
•Check Out and Edit Document: edits the document in the selected editor.
•Design: changes the design of a product:
•From Product: lists the sub-menu with the other products.
•Open: browses the file system and loads a design from a CAD file.
•From Front: the artwork assigned to the front, disabled when the front has no artwork.
•From Back: the artwork assigned to the back, disabled when the back has no artwork.
•Mirror: mirrors the current design.
•None: sets the design to a rectangle with the size specified by the Product size, disabled when the Product size is From design.
•Turn Over: turns over the product(s) contained in one or multiple frames.
•Mirror Product: mirrors the front and back artwork and mirrors the design.
•Convert to Single-sided Product(s): creates two single-sided products from a double-sided product (front/back) with the artwork assigned to the respective sides.
•Convert to Double-sided Product(s): combines two products (or multiple pairs of products selected in the Product panel) into double-sided products.
•Open in Product Editor: opens the selected product in the Product Editor.
•Edit with Preview: opens the product in Preview; this feature is useful for soft-proofing images which are color managed; you can perform color adjustments and contrast curve adjustment; see “Previewing Job Results” for more information on working with Preview.
•Check Out and Edit Document: opens images and documents in Acrobat or any other PDF Viewer/Editor application such as the Amfortis Editor, from where they can be checked in after editing.
•Auto-Layout Product: opens the Auto Layout dialog box, see “Placing Products with Auto-Layout”.
•Auto Fill Products: opens the Auto-Fill dialog box, see “Placing Products with Auto-Fill”.
•Create Grid: opens the Create Grid dialog box, see “Create Grid”.
•Collapse Tiles: collapses the tiles of a tiled image, see “Expand or collapse a tiled image”.
•Expand Tiles: expands a tiled images to see the individual tiles, see “Expand or collapse a tiled image”.
•Fitting: opens the Fitting Options dialog box where you can set the cropping, see “Fitting Options Dialog Box”.
•Revert Product Size: reverts the size of the original product back to the size it initially had when you added it to the Product panel.
•Locate Product on Sheet: highlights all the instances of a product/sheet on the current or first available sheet/print layout.
In the Print Layouts panel, context-click a product to display the following commands for this sheet:
•Delete Sheet: deletes the selected sheets from the Print Layout. panel. Deleting a Print Layout does not delete the Sheet Layouts that it contains.
•Duplicate Sheet: duplicates a Print Layout. This creates an exact copy of the current Print Layout, including all Sheet Layouts. See “Duplicating Products”.
•Edit Sheet: switches to Sheet Layout panel to allow editing the sheet.
•Locate Sheet: locates the placed instance of a sheet on the Print Layout.
•Proof Sheets: opens the QuickProof dialog to proof the selected sheets. See “QuickProof Products and Sheets”.
NOTE: The Print Layout Editor is only available for Wide Format jobs.
Product Status Icons
 | The design of the product has a contour-defining operation (other than the frame or trim-box). | |
 | The product is double-sided. | |
At least one of the product’s artworks was rejected. In addition, the thumbnail of the rejected artwork is shown with a red diagonal line. | ||
At least one of the product’s artworks has remarks other than rejected. | ||
 | At least one of the product’s artworks could not be aligned to the design. | |
 | At least one of the product’s artworks could not be aligned to the design with great confidence. | |
 |  | The product is Locked or Uniform. |
 |  | The product requires vertical or horizontal Grain/Flute and there are no placed instances that violate that requirement. |
 |  | The product requires vertical or horizontal Grain/Flute, but at least one placed instance violates that requirement. |
 | The product has white content, either from the artwork or generated. | |
 | The product has varnish content, either from the artwork or generated. | |
 | The product has primer content, either from the artwork or generated. | |
 | The image is being edited via an external editor. | |
 | Indicates that full-gamut color management is applied. | |
 | ‘F’ shows the effects of the rotation and mirror attributes (here shown with 90 degrees rotation and no mirroring. | |
 | Indicates a preflight report has been generated for the image. | |
 | Image preview has been generated (gray) or is being processed (green). | |
 | Color adjustments (saturation, contrast, curves) have been made in Preview. | |
 | The product has Image Operations that prevent changing the product’s size (tiling, canvas extensions, etc.). | |
There is a notification or snag message present on the product. The icon depicts the severity of the status: error, warning or intervention required. |
Sheet Status Icons
| The design of the sheet has a contour-defining operation. | |
| The sheet is Locked. | |
| The sheet’s workstyle and sidelay. | |
| | The sheet has Grain/Flute running in the specified direction (either can be long or short). |
 |  | The sheet has a custom bleed mask. The mask is up-to-date (white) or needs reviewing (yellow). |
| The sheet has white content, either from the artwork or generated. | |
| The sheet has varnish content, either from the artwork or generated. | |
| The sheet has primer content, either from the artwork or generated. | |
There is a notification or snag message present on the sheet. The icon depicts the severity of the status: error, warning or intervention required. |
Clicking the status icon opens the message(s) for that sheet/product in the Snag List.
Inspecting Products
You can use the Product inspector to inspect one or more products in the Product panel before placing them on a layout. See “Frame/Product Inspector” for more information.
You can also use some of the tools in the positioning toolbar for a product selected in the Product panel: size, scale, mirror and rotate the product. See “Positioning and resizing products with the positioning toolbar”.
Changes you make to the original in the Product panel do not affect products that are already placed on the sheet and vice versa.
doc. version 6.1.2