Auto Impose Window
Clicking the Auto Impose button in the Products tab opens the Auto Impose window where you define the settings for automatic imposition.
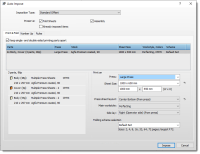 |
This window has the following tabs:
•Print & Fold Tab: In this tab you select a Press and related settings, and the Folding Scheme set for each part.
•Number-Up tab: In this tab you can select a Number-Up scheme to combine parts or products on the same Fold Sheet (see “Number-up Schemes”). This tab is disabled and not displayed if a number-up binding style has been selected for the product in the Binding Options.
•Rules Tab: In this tab you select the Auto Impose Depending on the imposition type, this tab either refers to the Auto Impose Rules resource (for Standard Offset), or you specify the settings directly in the tab (for digital printing modes: Cut & Stack, Booklet, Step & Repeat). The rule applies for all parts.
This window can also be opened from the Product View to edit your Auto Impose settings or to switch from manual imposition to Auto Impose.
NOTE: The Auto Impose window has fewer settings for web printing.
Imposition Type
Here you can choose the basic mode of the imposition for Bound jobs:
•Standard Offset: The regular imposition mode which is generally used for offset printing and displays the Folding Scheme Selection panel in the Print & Fold tab.
•Cut & Stack: The pages on a press sheets of a Cut & Stack imposition are cut and then put on top of each other to obtain the correct page sequence.
•Booklet: The press sheets form stacks of two-by-two page spreads that can be folded in the middle and then collected to create a booklet. Book signatures can be created to allow for the maximum folding thickness.
•Step & Repeat: Pages are duplicated on the press sheet which is cut to create 2 or more products.
The latter three modes are specifically for digital printing but may also be used for offset printing. For multi-product jobs, the digital printing modes always keep products apart so you cannot combine parts from multiple digital products on the same press sheet.
NOTE: Some of these options may be licensed features for Bound jobs. Unbound jobs are set to Standard Offset as the other options are not applicable.
Preserve
(Only enabled for Standard Offset) The Preserve options allow you to keep certain parts of the imposition as is when using Auto Impose:
•Fold Sheets: Preserves the existing fold sheets and the corresponding book signatures. Folding schemes are selected for the unassigned parts of the assembly and the rest of the imposition is created. This method can be used to preserve parts of the assembly and let Apogee Impose split the rest: assign a fold sheet to only those parts of the assembly you want to preserve, and then run Auto Impose with this check box selected.
•Assembly: Preserves the current assembly, i.e. the current arrangement and size of the book signatures. Folding schemes are selected to complete the imposition. You may have to adjust the assembly if it is too large.
•Already imposed items: Preserves the imposition of parts that have already been assigned to press sheets. Apogee Impose determines the book signatures, fold sheets and press sheets for unassigned parts.
Print & Fold Tab
The table lists all the parts in your product with a summary of the settings. Clicking a part allows you to edit the settings in the panes below. The list is updated as you define the settings. Parts with the same settings that can be printed on the same Press Sheet are grouped and appear together on the same line. This is also the case for multi-product jobs where parts from different products can be grouped together if their printing settings are compatible.
Keep single and double-sided printing parts apart
Select the check box if you do not want to group single-sided and double-sided elements for printing on the same Press Sheets.
The panel on the left shows the details of the selected part or the individual parts of a parts group as defined in the Product and/or Part inspectors. On the right you have more settings that need to be completed before you can create the imposition:
Print on Press
A drop-down list with the names of your Presses. If you have not chosen a Press in the Production Plan, this field is blank and you must choose a Press here.
Sheet Size
A drop-down list with all available Press Sheet sizes. The last item in the list, Manage Sheet Sizes, is a shortcut to the Sheet Sizes resource.
The width and height (W x H) of the Press Sheet are displayed under the drop-down list. You can also edit these fields to create a custom Sheet Size and save this custom size by choosing Save As in the drop-down list.
NOTE: If you choose a web press, you can only define the width.
Press sheet layout
A drop-down list with all the available press sheet layouts. Initially, the default sheet layout as specified for the chosen press is selected (from press). You can choose a different layout and revert to the default by clicking the revert icon.
Main workstyle
Initially, the default main workstyle as specified for the chosen press is selected (from press). A drop-down list with workstyles:
•Sheetwise: A sheet has different content on front and back sides. The sheets are turned, keeping the gripper edge at the same side.
•Work And Turn: Both sides have the same content. The sheets are turned, keeping the gripper edge at the same side.
•Work And Tumble: Both sides have the same content. Sheets are turned in such a way that the gripper edge is on the opposite side.
•Perfecting: A sheet has different content on front and back sides. Sheets are turned in such a way that the gripper edge is on the opposite side.
•Single Sided: There is only one side per sheet.
Initially, the default workstyle as specified for the chosen press is selected (from press). You can specify another workstyle for the job. This chosen workstyle is used for all Press Sheets of the part, unless an alternative workstyle is applied by the Auto Impose Rule (see “Auto Impose Rules”).
Side lay
Initially, the default side lay as specified for the chosen press is selected (from press). You can specify the Operator or Drive side for the job.
Folding scheme selection
(For Standard Offset only) A drop-down list with Folding Scheme sets and individual Folding Schemes. You can choose a set from which Apogee Impose will select the most appropriate schemes while taking the selected Auto Impose Rule into account. Alternatively, you can choose a specific Folding Scheme that you may prefer for a particular job. Choosing a set displays the available sizes under the drop-down list.
The default is the set at the top of the list. The last item in the list, Manage Folding Schemes, is a shortcut to the Folding Schemes resource.
NOTE: There is no option to choose a Folding Scheme as this is not applicable for Unbound products.
NOTE: For web printing, you need to choose a Web Production Scheme.
Number-Up tab
This tab is only displayed if you have not selected a number-up binding style for the product in the Binding Options. It allows you to create slots on the Fold Sheets where you can place different book signatures from the same or multiple products. See “Number-up Schemes” for more information.
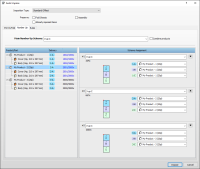 |
Main Number-Up Scheme
Select one of the schemes from the list. 1-up (default) means that no special set-up applies and you cannot combine parts of the same or multiple products.
Combine products
Select/clear this check-box if you want/don’t want Auto Impose to combine the parts of multiple products on the same Fold Sheet. Auto Impose will always try to combine the parts of multiple products in the same job.
Product/Part - Delivery
Selecting a scheme in the Main Number-Up Scheme box lets you inspect how the products and parts are assigned to the deliveries (A, B, C, etc. and color-coded). You also see the actual and the requested copy counts separated with a slash and in blue if these two counts do not correspond. Deliveries are parts that are not necessarily combined to create the same product.
Scheme Assignment
The panel on the right shows the product assembly blocks (#1, #2, #3, etc.), the actual copy count per delivery and the number of deliveries (A, B, C, etc. and color-coded) for each assembly block. The assigned scheme is taken from the Main Number-Up Scheme selected above but you can override it here.
Rules Tab (Standard Offset)
In this tab you choose a predefined resource to impose all the parts of the job. Different rules can be chosen for Bound and Unbound products.
Bound Products
Auto Impose Rule
A drop-down list of rules (see “Auto Impose Rules”) that control which Fold Sheets can be used for the job, whether an alternative workstyle is required and how book signatures are sorted in the assembly. The name is usually shorthand for the main characteristics of the rule. The specified Auto Impose rule is for all the parts of the product.
Unbound Products
Imposition Mode
Choose how to fill sheets
•Produce requested number of wanted copies: the imposition uses the copy counts as absolute values and the run length is calculated for each press sheet in order to obtain the copy count.
•Fill sheet, using copy count as ratio: the sheets are filled with as many elements as possible using the copy counts of the parts as ratio; the created press sheets have a run length equal to 1.
NOTE: If you choose the latter imposition mode, it is recommended to select an auto-fit rule that uses the Fewer sheet layouts strategy, and set the Allow extra printed material to Whatever it takes.
Auto Fit Rule
A drop-down list of rules (see “Auto Fit Rules”) that control the arrangement of elements on the Press Sheet and when and how the elements are rotated. The name of the rule is usually shorthand for the main characteristics of the rule. Under the rule name you see the auto fit strategy and, depending on the selected rule, a slider to indicate the number of extra printed copies that you want to allow in order to reduce the number of Press Sheets (Allow extra printed material), or a field to enter a percentage of the allowed waste (Keep waste below).
Rules Tab (Cut & Stack)
In this tab you specify the rules for imposing the pages on the press sheet so they can be cut and then stacked in the correct sequence.
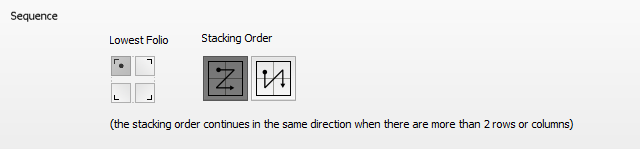 |
Sequence
Lowest Folio
Select one of the four corners to set the starting point for the pages in the page arrangement grid. If the grid has more columns or rows, the stacking order continues in the same direction.
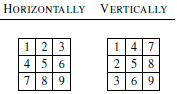
Stacking Order
You can choose from two stacking orders for each Lowest Folio position:
•Horizontally: To cut all columns apart and stack them on top of each other. Then repeat in the other direction.
•Vertically: To cut all rows apart and stack them on top of each other. Then repeat in the other direction.
 |
Rotate Pages
You can let Apogee Impose rotate pages automatically to make them fit on the press sheet, or you can force pages to not rotate, or to rotate 90° clockwise, 90° counterclockwise, or 180°.
Split into Book Signatures
Select the Limit number of press sheets to check box to split large jobs into smaller signatures so the stacks of sheets can be cut. Enter the maximum number of sheets to stack.
Gutter for Cutting
•Apply page trim margins at cut: By default, Apogee Impose positions the trim pages using the trim margins. You can disable the Apply page trim margins at cut, if the middle cut is good enough as a trim cut.
•Extra gutter: Specify an extra amount of space to provide for cutting.
Rules Tab (Booklet)
In this tab you specify the rules for a page arrangement using two-by-two page spreads.
Split into Book Signatures
Select the Limit number of press sheets to check box to split large jobs into smaller signatures so the stack of sheets can still be folded. Enter the maximum number of sheets to stack.
Multiple Page-Spreads
If more than one two-by-two page spreads can be placed on the press sheet, you have two options for filling the press sheet:
•Cut and Stack: Page spreads are arranged on the press sheet so they can be cut and stacked ready for finishing.
•Step and Repeat: Each page spread is duplicated and repeated to fill one press sheet; may result in more press sheets
Sequence (multiple spreads)
This setting is enabled if you choose the Cut and Stack arrangement for multiple page spreads: See “Rules Tab (Cut & Stack)”.
Gutter for Cutting
•Apply page trim margins at cut: By default, Apogee Impose positions the trim pages using the trim margins. You can disable the Apply page trim margins at cut, if the middle cut is good enough as a trim cut.
•Extra gutter: Specify an extra amount of space to provide for cutting.
Rules Tab (Step & Repeat)
In this tab you specify the rules for duplicating and repeating pages to fill the press sheet.
Rotate Pages
You can let Apogee Impose rotate pages automatically to make them fit on the press sheet, or you can force pages to not rotate, or to rotate 90° clockwise, 90° counterclockwise, or 180°.
Split into Book Signatures
Select the Limit number of press sheets to check box to split large jobs into smaller signatures so the stack of sheets can still be folded. Enter the maximum number of sheets to stack.
Gutter for Cutting
•Apply page trim margins at cut: By default, Apogee Impose positions the trim pages using the trim margins. You can disable the Apply page trim margins at cut, if the middle cut is good enough as a trim cut.
•Extra gutter: Specify an extra amount of space to provide for cutting.
doc. version 13.1.1